Inventory management for SimCapture
Discover the best practices for efficiently organizing and optimizing inventory for SimCapture to streamline workflows and ensure smooth operations.
Table of Contents
What is Inventory management for SimCapture
Our Inventory Management feature allows you to track the use of capital and consumable inventory throughout your centers and within your simulations.
Things to know before you begin
- This currently does not sync with the previous inventory management feature. Clients will need to work with Support to move or decide not to move old inventory.
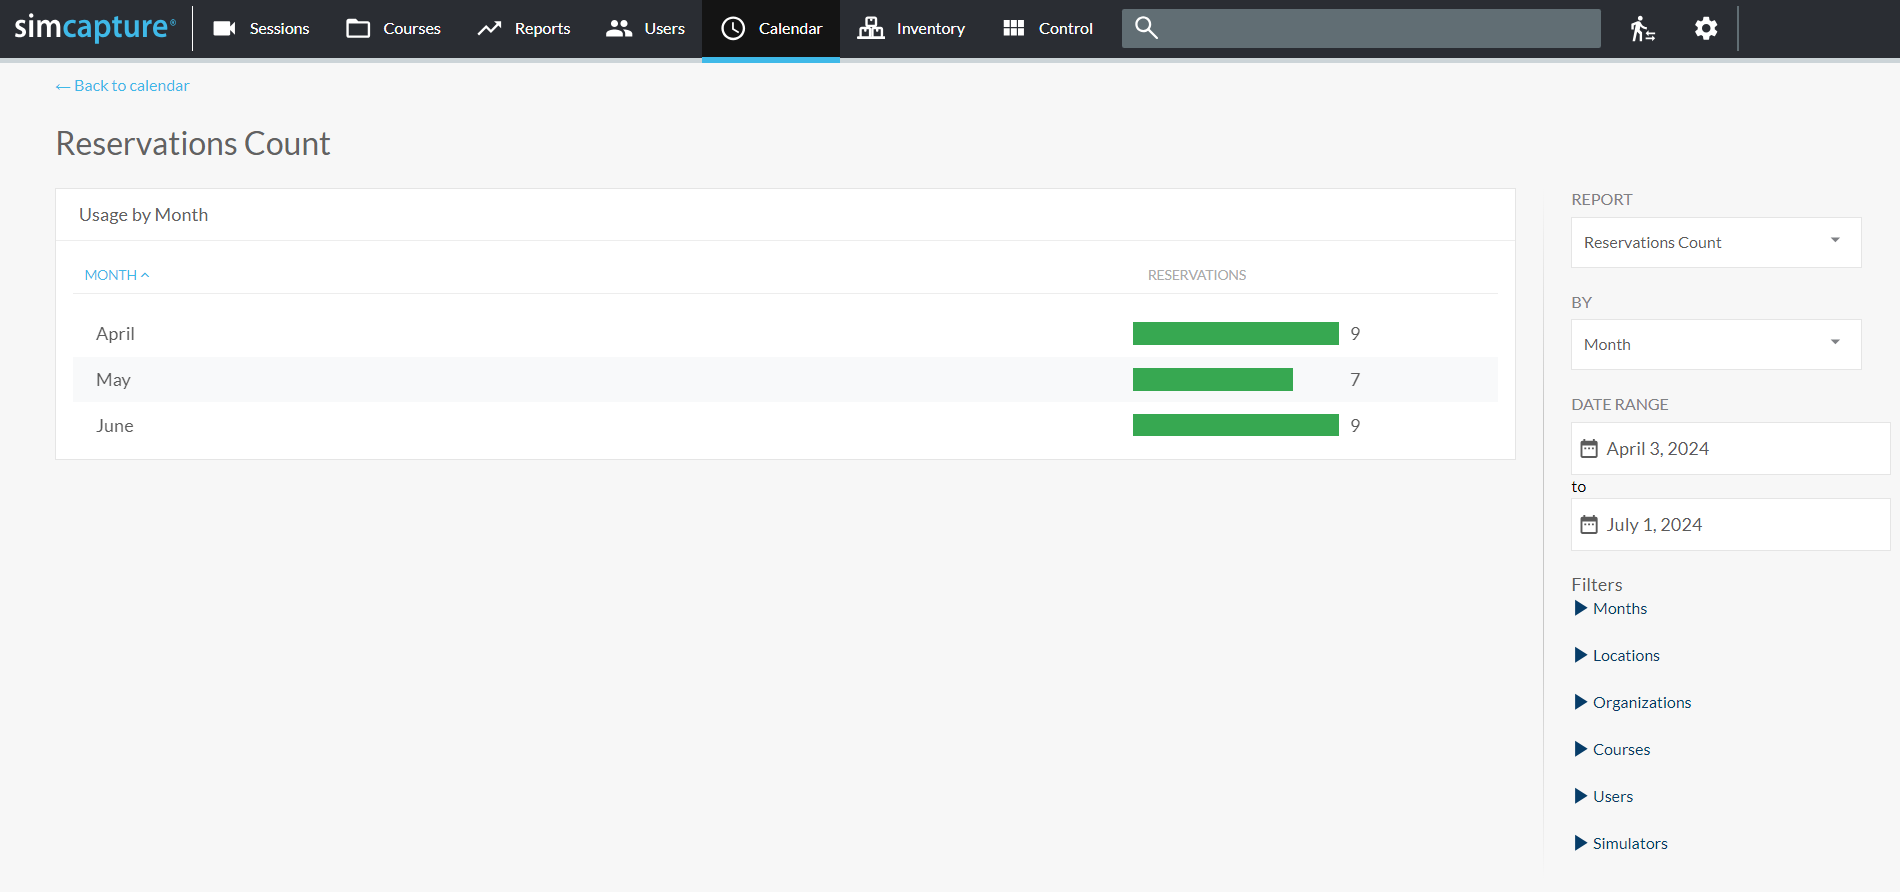
- Calendar > Reports will not have the Inventory Filter during beta testing to reduce confusion between old and new utilization.
- Scenarios and reservations with old inventory will not error if used, but they will need to be updated within the scenario or reservation to refer to the new inventory management.
Access and use inventory management
In this article, we will look at how to use inventory management and how it integrates with Sessions so that you can get started on the benefits it will add to your organization.

Once a System administrator has logged in to their SimCapture organization, they will now see Inventory in the Global navigation bar. Clicking the Inventory button will take you to your Inventory Manager page.
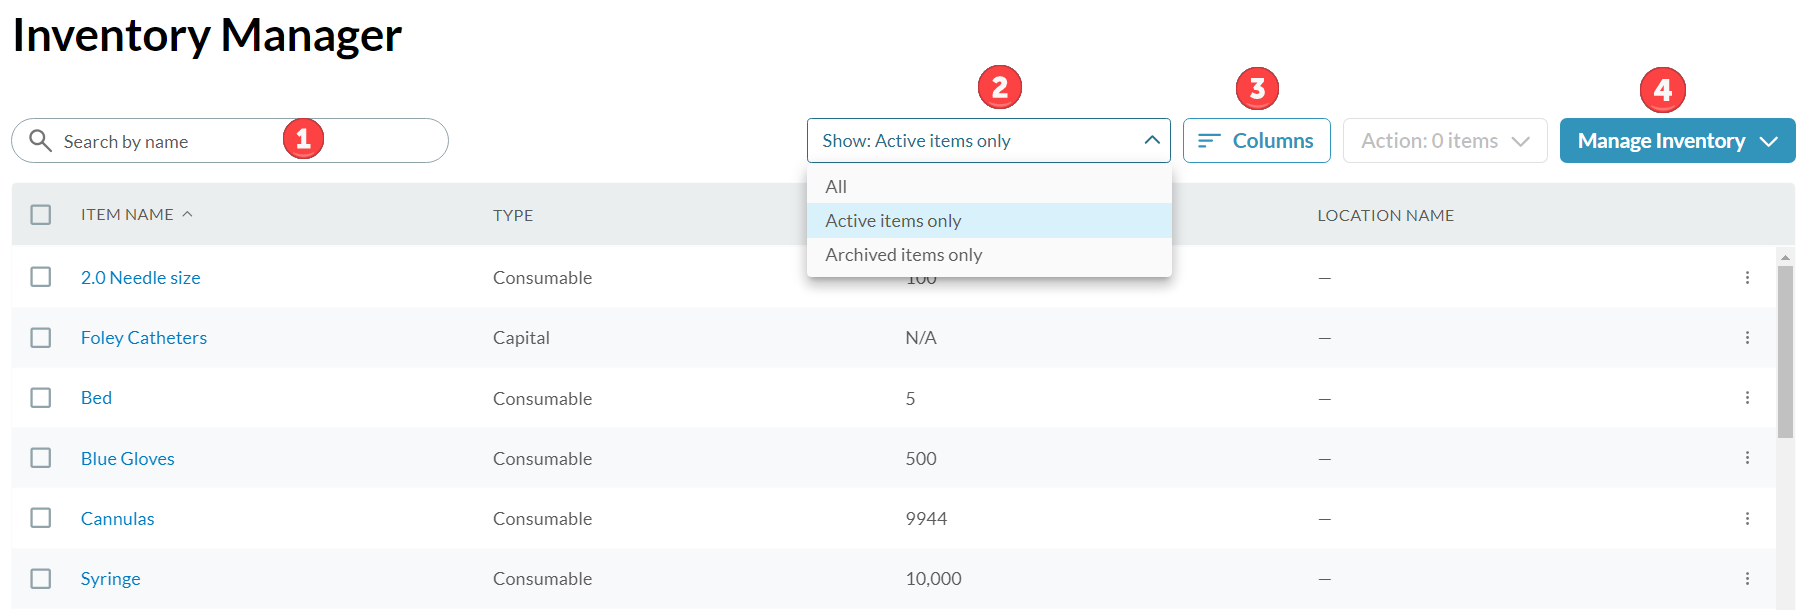
Once on this page, you can do the following:
- Search inventory by name.
- See items by All, Active items only or Archived items only within the Show dropdown. Archived items are items that could previously be used within scenarios and reservations but are no longer selectable.
- Select the columns you want to see information on.
- Manage your inventory, including importing, exporting, and predictive report.
Search inventory by name

To search inventory by name, type the item name in the search box and, if it exists, it will appear under the Item Name column. Note: Partial text can be used in the search and if an item does not appear, remember to select All, Active items only or Archived items only from the Show dropdown.
Show dropdown

The Show dropdown allows you to see All items, Active items only or Archived items only. Note that archived items are items which could previously be used, but currently, are not selectable.
Columns

Columns show you all the fields that are selectable. Additionally, when choosing a filter, it is saved in the URL so that you can bookmark a specific view. You can also share this URL with others, and they will see this view as well.

From this page, by selecting the kebab menu (3 vertical dots), you can edit or archive an item.
Manage inventory

Clicking Manage Inventory allows you to:
- Add inventory items.
- Import inventory.
- Export inventory.
Let’s explore these options a little further.
Add inventory item
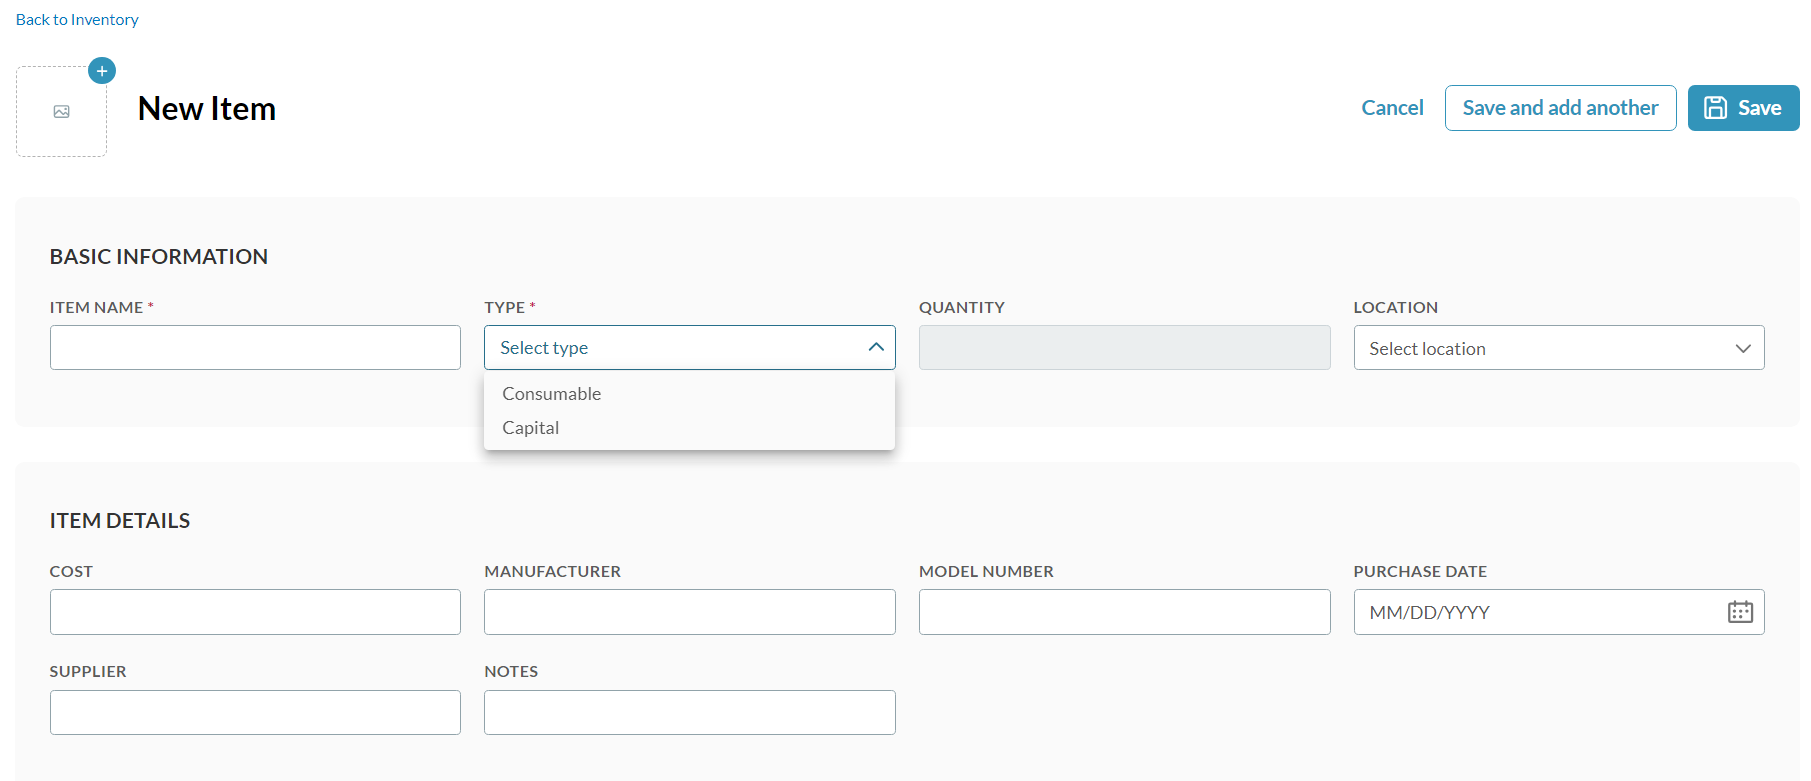
Choosing the add inventory option allows you to enter information into these fields:
Basic Information
- Item Name: The name of your item will go here. Note that only one item per line can be added. This field is required.
- From the dropdown you will choose Consumable or Capital. This field is required.
- Quantity: The number of the item you have. This field is required for both Consumable and Capital field types.
- Location: This dropdown pulls the locations from the locations that are in your System Settings. Locations are not required. You cannot create a new location within Inventory Manager. To create new locations, go to the gear icon to reach the System Setup menus and navigation to the Locations menu there.
If you choose you can also add an image of your item.
Item Details
These fields are not required, but, filling them in allows for more robust inventory tracking. These fields are:
- Cost
- Manufacturer
- Model Number
- Purchase Date
- Supplier
- Notes
Once you have added your line item(s) you can click Save and add another or, click Save.
Import Inventory
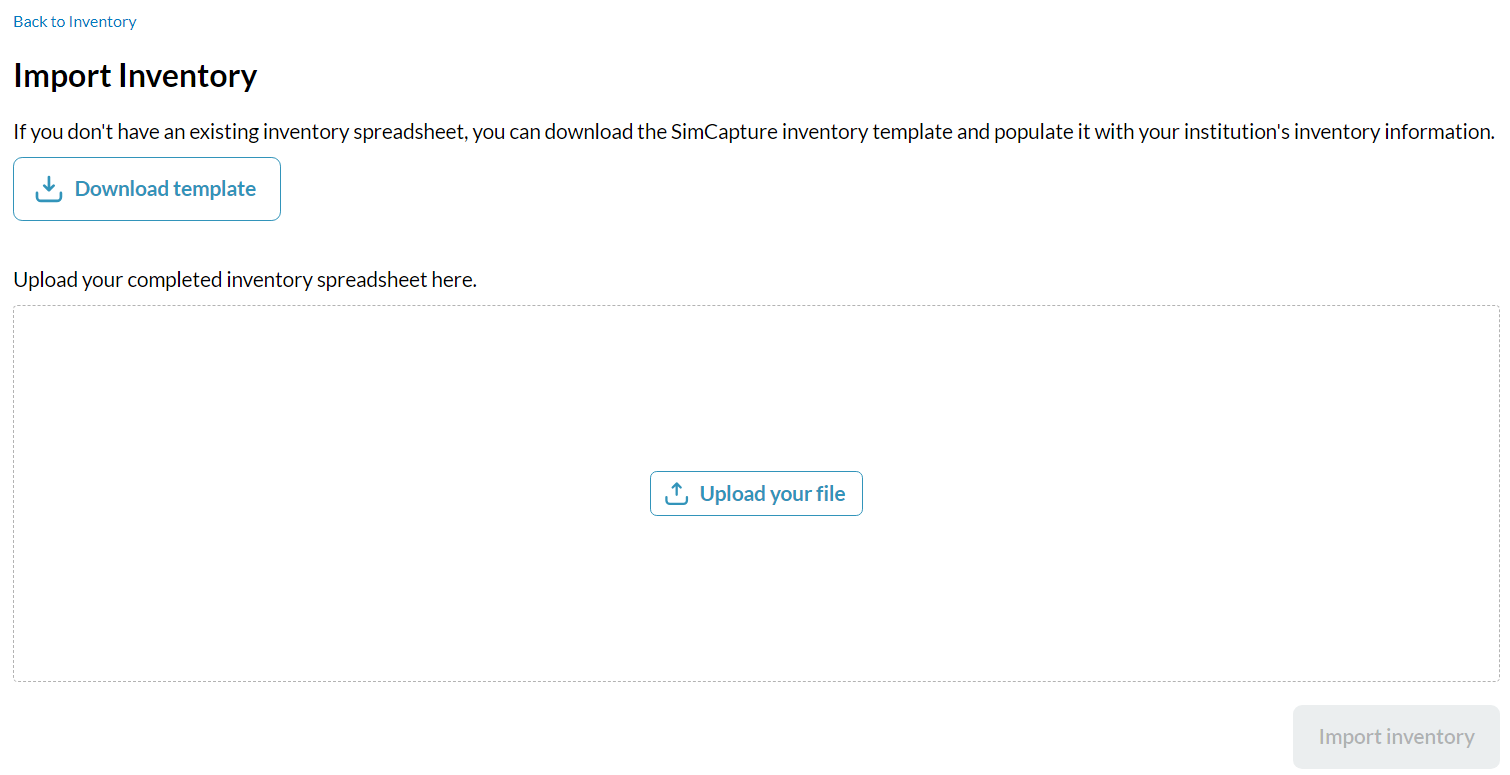
When you select Import inventory, you can either download a SimCapture inventory template and populate it with your institution’s inventory information.
The spreadsheet contains the following information:
- Name of item (Required)
- Type (Capital or Consumable) (Required)
- Quantity (Only applicable to consumable items)
- Cost
- Manufacturer
- Model Number
- Purchase date in YYYYMMDD format
- Supplier
- Notes
- Archived. This will default to Active when blank.
Once you have your spreadsheet filled out, you will then upload your file and click Import inventory.
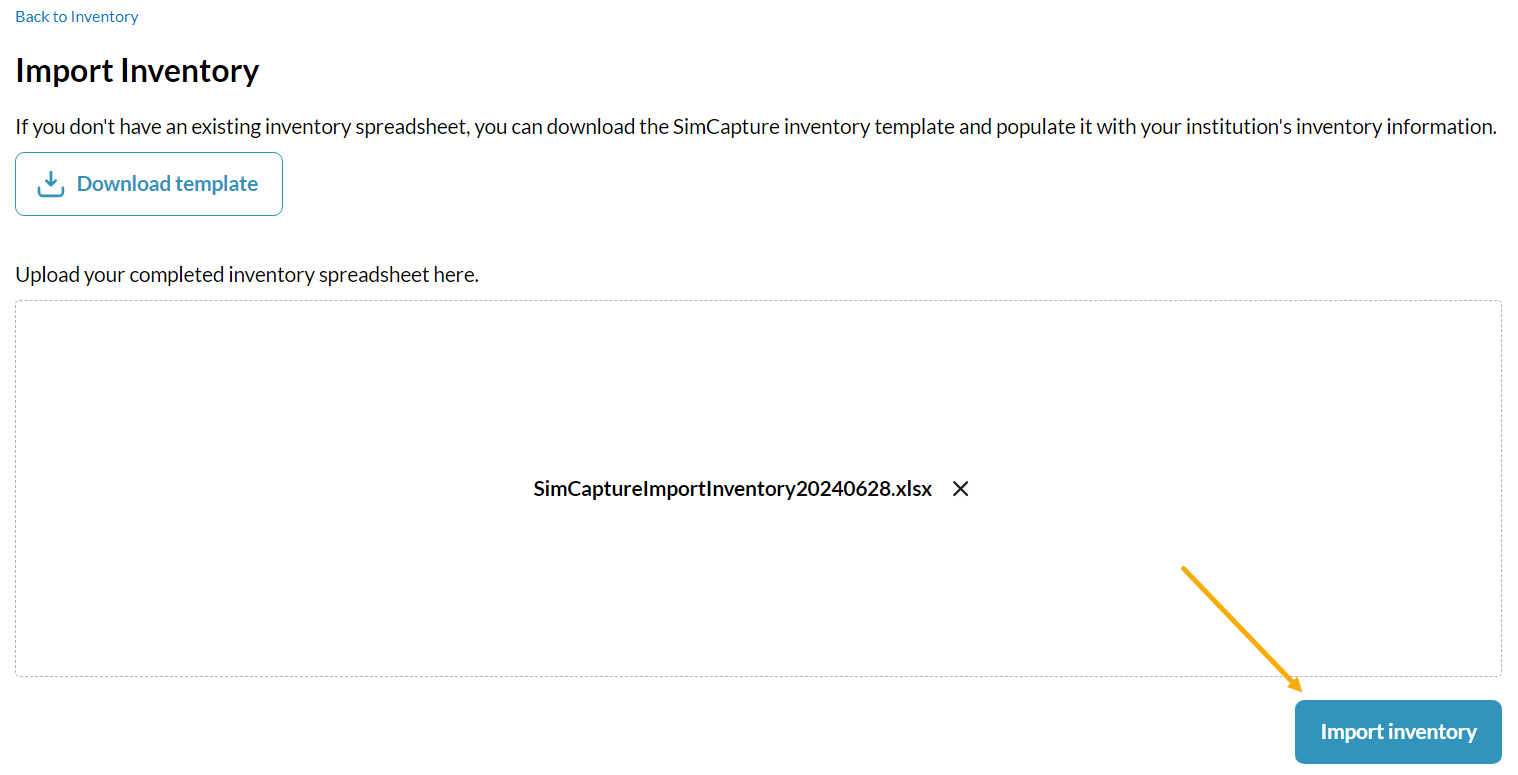
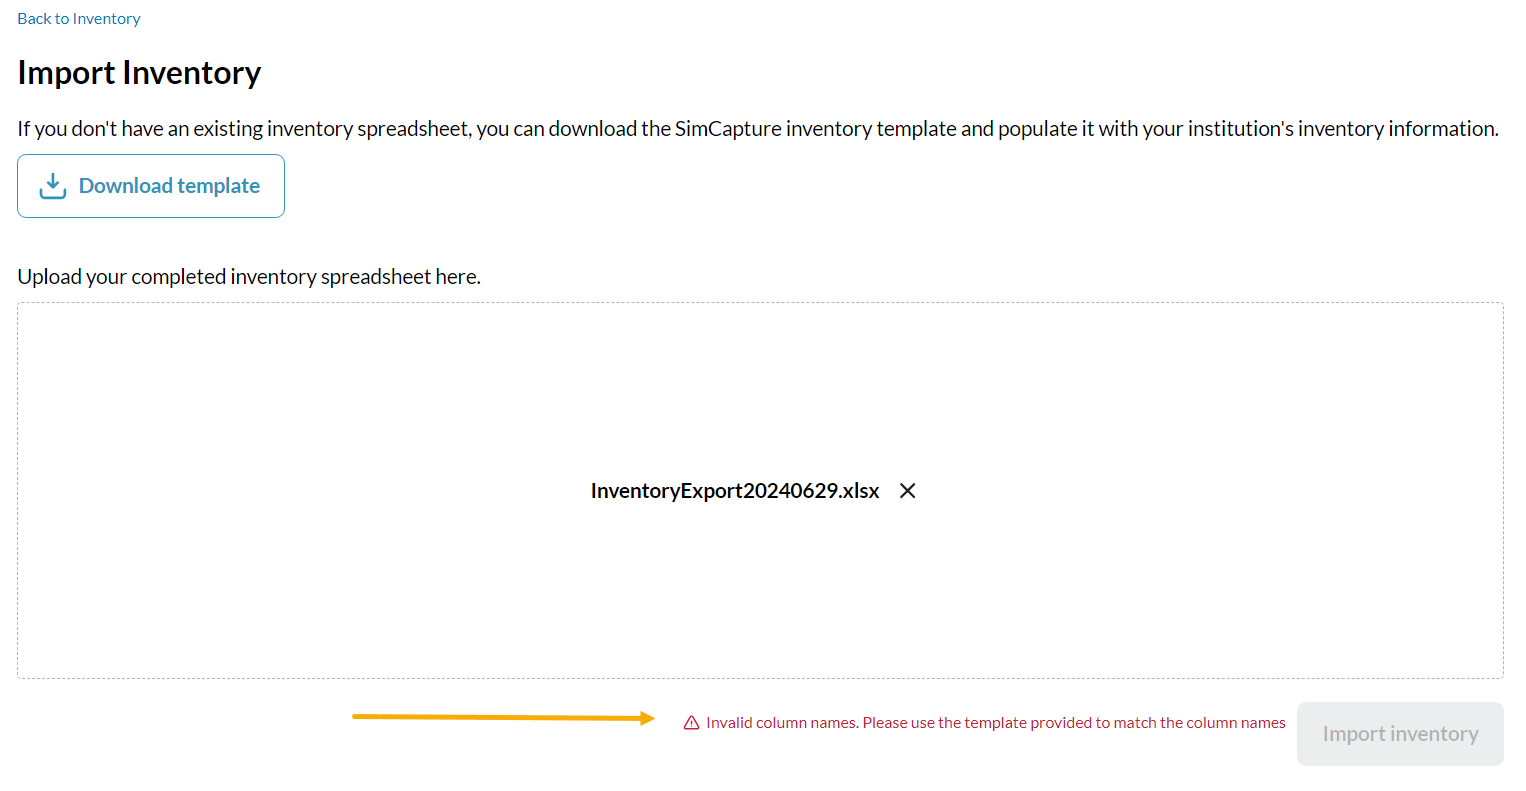
Note that documents with additional columns which do not match with the SimCapture template will not be allowed to upload:
Should you not enter a quantity for a consumable item, an error will show showing the line number and item in question.
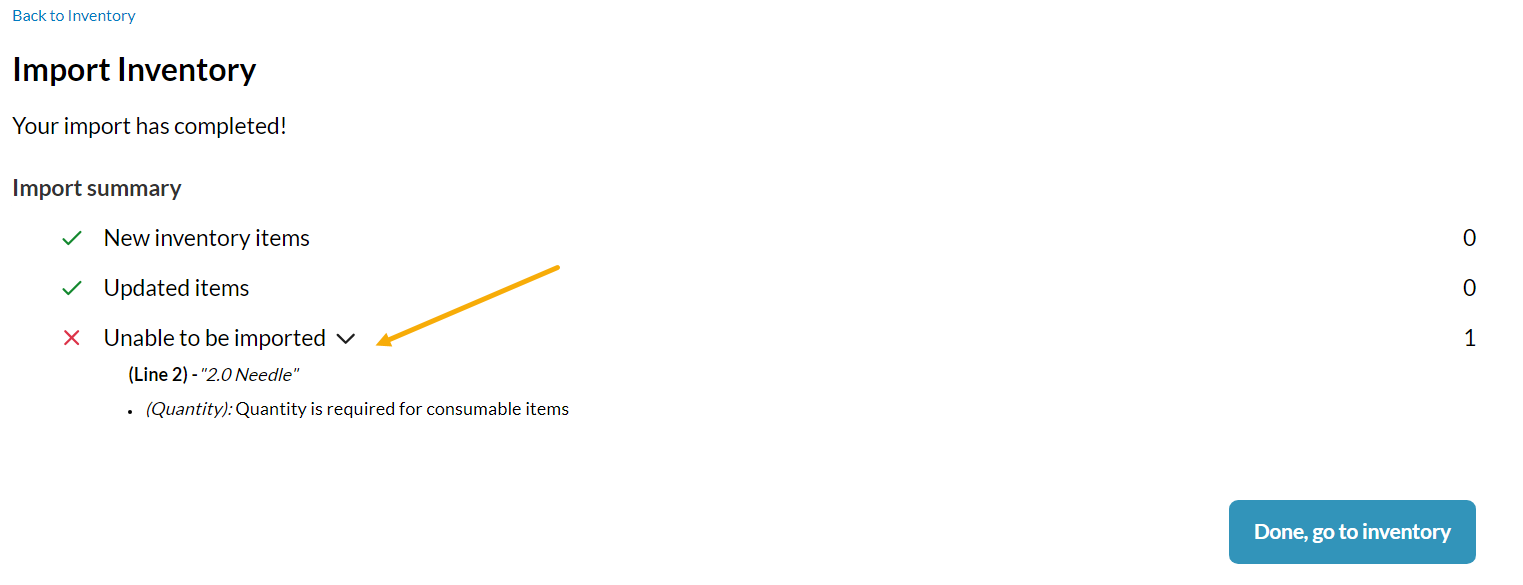
To correct this error, go back to your inventory spreadsheet, make your corrections and re-upload the file.
Updated Inventory
Updated Inventory will match on the name of the Inventory Item. Information within the excel spreadsheet will overwrite the information within SimCapture.
For quantity of an item, this will be overwritten rather than added to the current quantity. So, if the quantity of Bandages is 50 in SimCapture and 55 in the excel spreadsheet, once saved, the updated quantity will be 55.
Export Inventory

There are three types of inventories that you can export. Past inventory consumption, Current inventory and Estimate future inventory consumption.
Current inventory
SimCapture will export your current list of inventories to a .csv file. The columns shown are:
- Name of item (Required)
- Type (Capital or Consumable) (Required)
- Quantity (Only applicable to consumable items)
- Cost
- Manufacturer
- Model Number
- Purchase date in YYYYMMDD format
- Supplier
- Notes
- Archived
Estimate future inventory consumed
SimCapture will estimate how much inventory you will consume after a certain amount of time by using your current scheduled reservations. A Start and End date are required for this option. The columns shown in the exported .csv file are:
- Course Name
- Scenario Name
- Reservation Title
- Reservation Start Date
- Reservation Start Time
- Reservation End Date
- Reservation End Time
- Inventory Item Name
- Inventory Item Type
- Beginning Inventory Item Quantity
- Quantity Consumed
- Ending Inventory Item Quantity
For future inventory usage, we currently look at only reservations. In this case, with the quantity consumed, if it is per session, we assume that it is one session. One reservation = one session.
If it is per participant, for an inventory item, we first look to see if the participant is self-enrolled. If the participant is self-enrolled, we look at the number of slots available. If the reservation is not set to self-enrolled, we look at the number of expected participants. If the number of expected participants is blank, we then look at the number of currently enrolled participants in the reservation.
If this area is blank, we always go with one participant.
Where does this data go?
You may wonder where all this inventory data goes. It goes to two places. The first is when you are creating a Scenario for a Course where the inventory management is attached to it.
This information will be shown within Room Setup
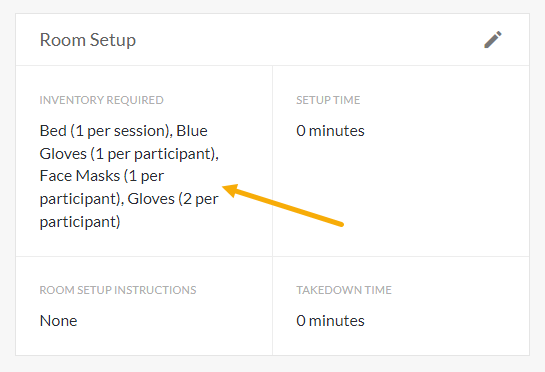
Click the pencil icon to be taken into the Room Setup. Once inside the room, you will click inside the Inventory Required box to add new/more inventory. If an item is labeled as capital, it does not get consumed, therefore, there will be no number or Participant/Session field next to it. Note: Consumable items cannot go below 1.
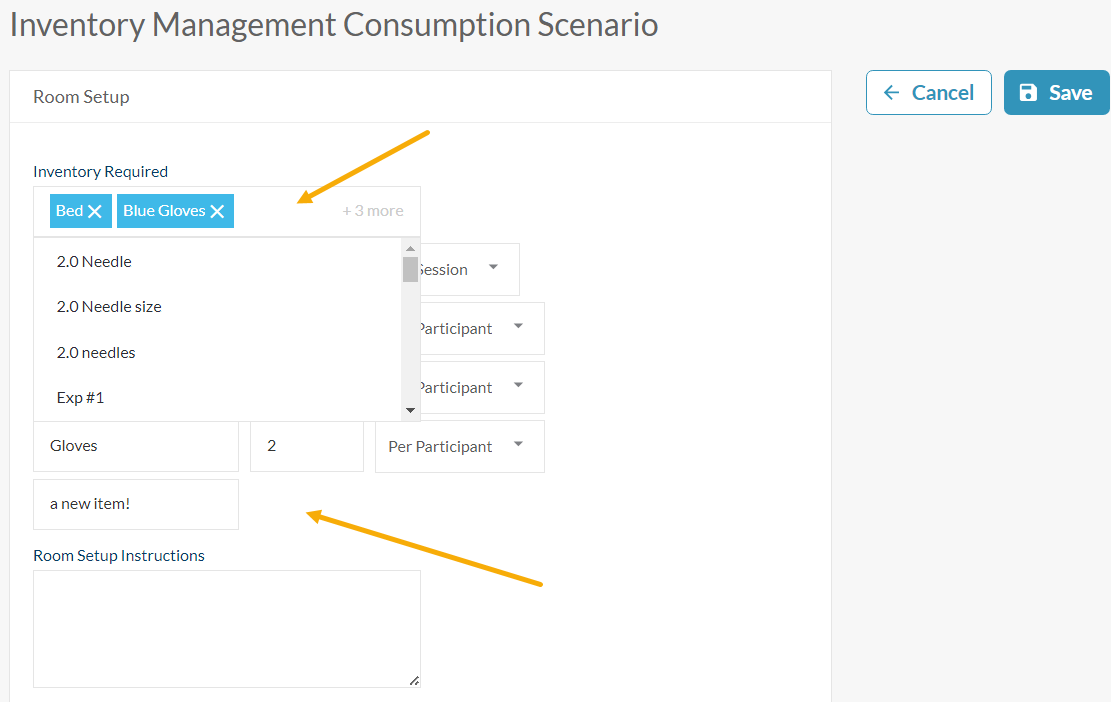
Consumable items are per session or per participant. For example, if you run a session with 3 participants, you will consume 3 “consumable” items. Running a session with 5 participants will consume 5 “consumable” items.
Per session is if you have 5 or 500 participants you are consuming the same amount. For example, you have 500 participants and 2 blood pressure cuffs, you are still using 2 blood pressure cuffs in a single session.
When you are finished with your required inventory, remember to click Save to store the inventory information within the Room Setup.
Use of inventory management with sessions
Inventory management can be used with sessions at the Ad-hoc level or at the reservation level. However, sessions at the Ad-hoc level will use inventory differently than sessions at the reservation level. Let’s look at how these sessions differ when it comes to inventory management.
Ad-hoc level session
If you begin an Ad-hoc session using your inventory management scenario, the session will refer to the inventory within that scenario.
For example, your inventory management scenario has, Bed (1 per session), Face Masks (1 per participant), Gloves (2 per participant) and 2.0 Needles (1 per participant). You also have 5 Participants in this scenario.
But remember, your Inventory Manager shows the total number of items that you have on hand. In this case, you have Bed (5), Face Masks (100), Gloves (2,000) and 2.0 Needles (1,000).
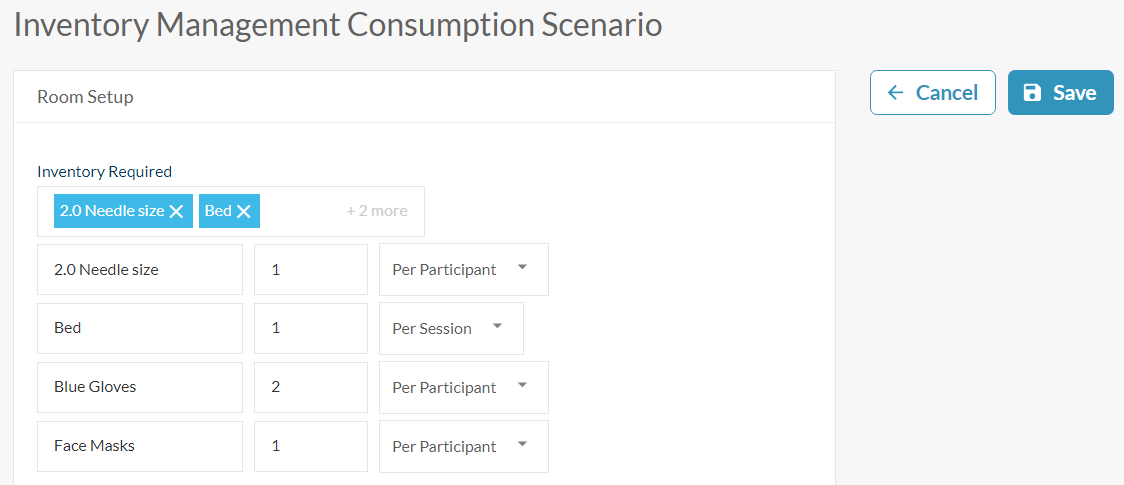
You then begin your Ad-hoc Session making sure to add, within Session Settings, the correct course and inventory management scenario as well as the participants assigned to the course. SimCapture will pull the inventory information from the Scenario.

When the Session ends, you will notice that your 2.0 Needle size has gone from 1,000 to 995, Bed from 5 to 4, Gloves from 2,000 to 1,990 and Face Masks from 1,000 to 995.
These numbers are based on consumable items of 1 Bed per Session and other items being per Participant all found within the Scenario information.
Note: If an error is made, click Match inventory required to go back to the original inventory that is needed.
Post consumption
Should you realize that you did not use an inventory item in a session, you can go back to the session, edit it to remove the item you did not use and the Inventory Manager will re-add that item back into your inventory. Conversely, you are able to add items after the session and this will be deducted from the current total for that item.
Reservation level session
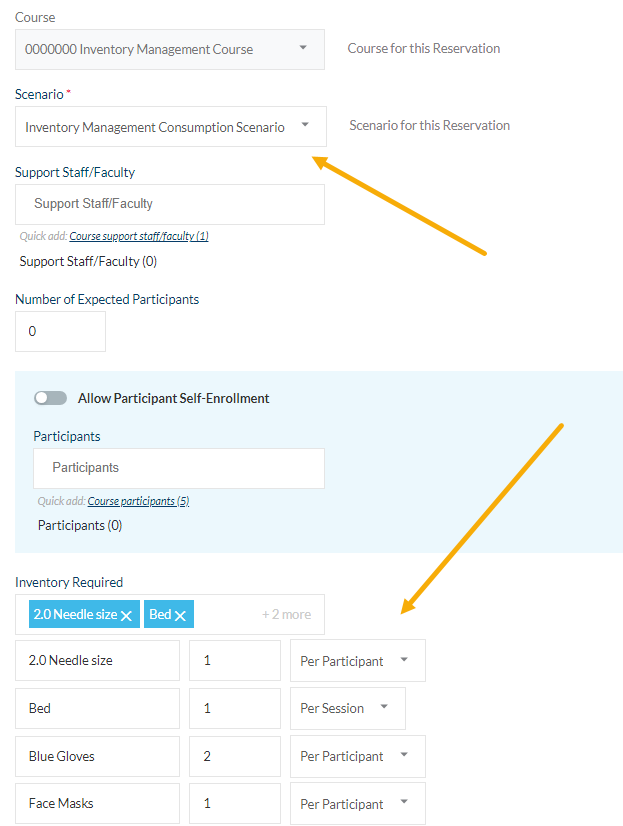
In this example, you will add a reservation to your calendar by accessing the calendar via the Agenda from your Course or directly.
Once on the calendar click + Add Reservation. Fill in the reservation form and, if you choose a scenario that already has inventory, it will auto-populate with what is already in the scenario. You can also update your inventory here as well.
If you choose a scenario that does not have inventory, you will be able to populate any needed inventory from the reservation creation screen.

When you start a session from a calendar reservation, your inventory is pulled directly FROM the reservation and NOT from the inventory scenario you have created.