LMS configuration for Blackboard
Discover how to effectively configure your Learning Management System (LMS) for Blackboard, ensuring seamless integration and maximizing the platform's capabilities for your educational needs.
Table of Contents
Things to know before you begin
This information instructs System administrators in how to configure their LMS to SimCapture Enterprise and SimCapture Exam System which is the first step in using the integration.
Let's look at how to configure LMS (Learning Management System) for Blackboard.
Blackboard Key Setup
- Go to https://developer.blackboard.com/
- Login with your Blackboard account. You should be directed to the My Applications page, but if not, click the My Applications link in the top navbar.
- If this is your first time creating an application, click Register a REST or LTI application.
- If you have already registered some applications, on the right side of the page there will be a + icon in a circle. Click that button to add a new application and select Manual Registration from the dropdown.
Register a new application
- Name the Application.
- For Domain(s), put your SimCapture URL without https://, for example just my-institution.simcapture.com
- Leave Group as-is
- Toggle the My Integration supports LTI 1.3 switch.
- For Login Initiation URL*: https://api.simcapture.com/lti/login
- For Tool Redirect URL(s)*: https://api.simcapture.com/lti/redirect
- For Tool JWKS URL*: https://api.simcapture.com/lti/jwks
- For Signing Algorithm, select RS256
- Leave Custom Parameters blank and click Register Application.
*The subdomains for these URLs will vary based on your region.
The next page you will see is the LTI Integration Key page. Here, you will fill in the following parameters that need to be entered into SimCapture in the next step:
- Application ID
- Issuer
- Public keyset URL
- Auth token endpoint
- OIDC auth request endpoint
Configure SimCapture
Log into your SimCapture organization take these steps these steps to configure it for use with Blackboard.
- Click the gear icon to go to System Setup.
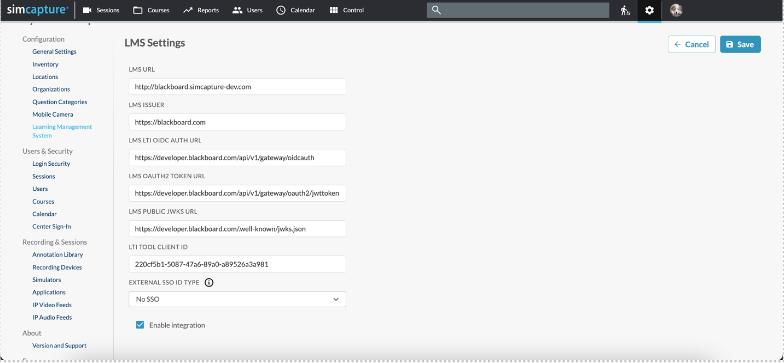
- Click Learning Management System.
- Click Edit and enter the following settings:
- LMS URL: Enter the URL you use to normally access your LMS.
- LMS Issuer: Paste the Issuer from the previous section.
- LMS LTI OIDC Auth URL: Paste the OIDC auth request endpoint value from the previous section.
- LMS OAuth2 Token URL: Paste the Auth token endpoint value from the previous section.
- LMS Public JWKS URL: Paste the Public keyset URL value from the previous section.
- LTI Tool Client ID: Paste the Application ID value from the previous section. (Not the Application Key)
- LMS Membership Request Limit should stay at the default of 50.
- LMS Course Members Sync Limit should stay at the default of 2500.
- External SSO ID Type: Choose Email if you are testing with SSO.
- Click Save.
Blackboard Setup and Launch
Here, we will look at setting up and launching Blackboard.
- Go to your Blackboard instance and log in. You must have System Administrator privileges to complete this setup.
"https://blackboard.simcapture-dev.com/" - Click System Admin in the top navigation bar.
- Go to the Integrations area and click LTI Tool Providers.
You will now find yourself on the LTI Tool Providers page. Click Register LTI 1.3/Advantage Tool.
You will then paste the Application ID from the previous section into the ClientID field and click Submit. Once submitted, you will select Approved for the Tool Status.
In the Institution Policies area, check ALL of the checkboxes in the User Fields to Send section. Make sure the radio button for Allow Membership Service Access and Allow grade service access is set to Yes and click Submit.
After clicking Submit, you should be back on the list of Tool Providers. Locate the tool you just created, hover over it and you should see a caret. Click the caret to open a dropdown menu, then select Manage Placements.
On the Manage Placements page, click Create Placement and make sure Availability is set to Yes.
- For Type (placement type) select Course tool. Directly below, check Allow student access.
- Check Launch in New Window.
- For Target Link URI, enter your SimCapture URL, such as “my-institution.simcapture.com”
Using the Integration to SimCapture within a Blackboard course
- Create a new course or choose an existing course in Blackboard.
- Click Content option in the left side panel.
- Select Tools > More Tools.
- Select the LTI tool you configured in the previous section.
- Click Submit.
You should now see this tool available. Click on the tool and it will launch SimCapture, allowing you to link to an existing course in SimCapture or to create a new course. Note: You will need to be logged into SimCapture to link or create the course.
Notes
- Course titles can only be transferred, lessons and other smaller components from Blackboard will not appear in SimCapture.
- Users are transferred on initial course linking/setup. Any future updates are applied automatically on a nightly basis.
- A total of 500 users can be transferred from the LMS to SimCapture during this process for a single Course. Please reach out to Support if your Course contains more than 500 users.
- Courses set to the Status of Completed or Archived will not sync new user information.