Inventory Management for SimCapture
Discover the best practices for efficiently organizing and optimizing inventory for SimCapture to streamline workflows and ensure smooth operations.

Written by Jeri Ellis
Updated at October 24th, 2025
Table of Contents
- SimCapture Cloud Release Notes
- SimCapture Cloud Administrator and Faculty Help
- SimCapture Cloud Learner Help
- SimCapture On-Premise Help
- SimCapture for Skills Help
- SimCapture Mobile Camera App
- SimCapture Companion Apps Help
- SimCapture Integrations Help
- Samaritan AI Help
- SimCapture Cloud Use Cases
- Hardware and Network Technical Information Help
- Glossary
Inventory Management in SimCapture
SimCapture's Inventory Management feature helps you track and manage both capital and consumable inventory across your simulation centers and sessions. This tool ensures accurate usage reporting, better resource planning, and streamlined operations.
What Is Inventory Management?
Inventory Management allows you to:
- Monitor equipment and supplies used in simulations
- Track inventory across multiple locations
- Link inventory items to specific sessions and scenarios
- Improve accountability and resource allocation
Things to Know Before You Begin
- This feature does not sync with the previous inventory system.
- If you used the older system, contact SimCapture Support to transfer your inventory or choose to start fresh.
- Scenarios and reservations using old inventory will not show errors, but they must be updated manually to reference the new inventory system.
Benefits of Inventory Management
- Real-time tracking of inventory usage
- Better visibility into resource consumption
- Simplified reporting and auditing
- Enhanced coordination across simulation centers
Accessing Inventory Manager

Once a System Administrator logs into their SimCapture organization:
- Locate the global navigation bar.
- Click Inventory to open the Inventory Manager page.
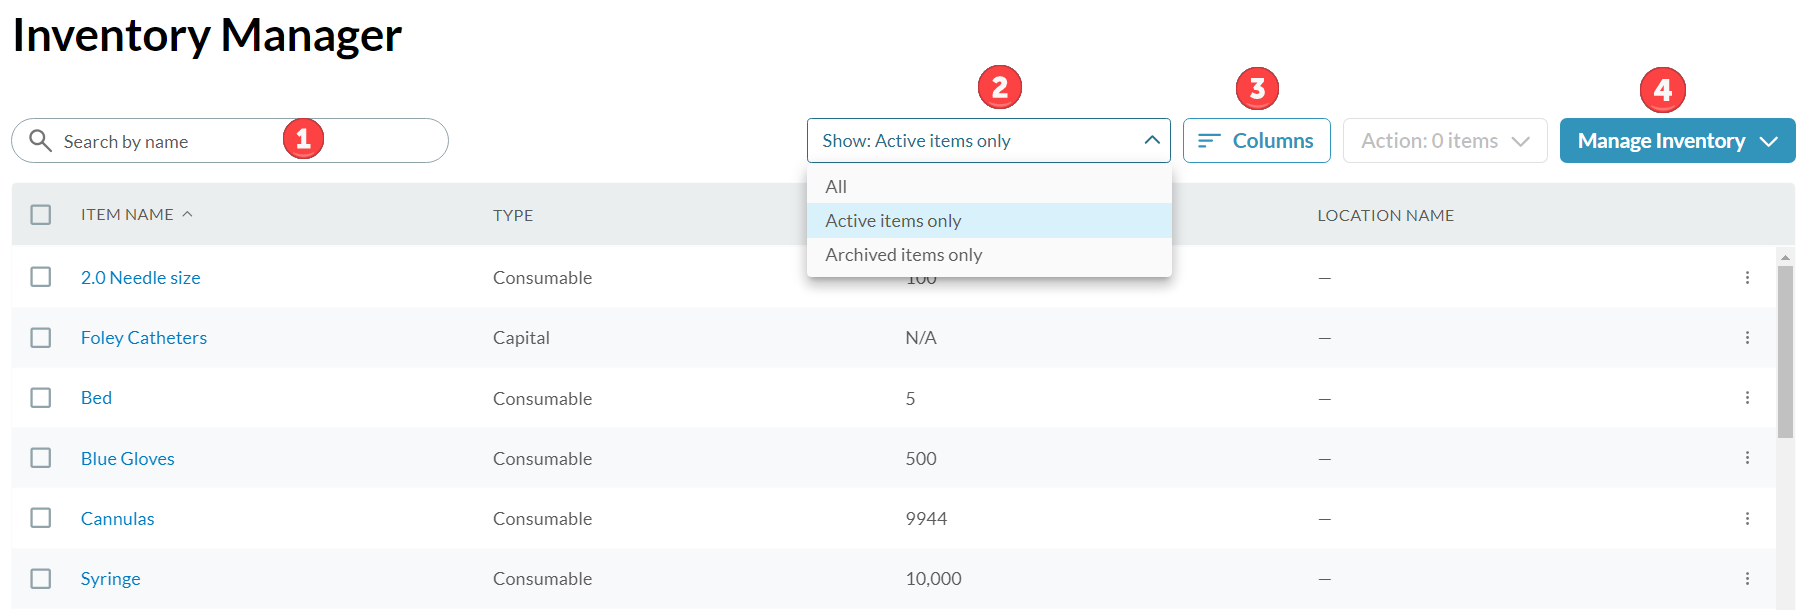
Navigating the Inventory Manager
From the Inventory Manager page, you can:
- Search inventory by name
- Filter items using the Show dropdown (All, Active, Archived)
- Customize visible columns
- Manage inventory (Add, Import, Export, Predictive Reports)
Search Inventory by Name

To find an item:
- Type the item name (or partial text) into the search box.
- Results will appear under the Item Name column.
- If no results appear, check the Show dropdown to ensure the correct filter is selected.
Show Dropdown

Use this dropdown to filter inventory:
- All items
- Active items only
- Archived items only (items previously usable but no longer selectable)
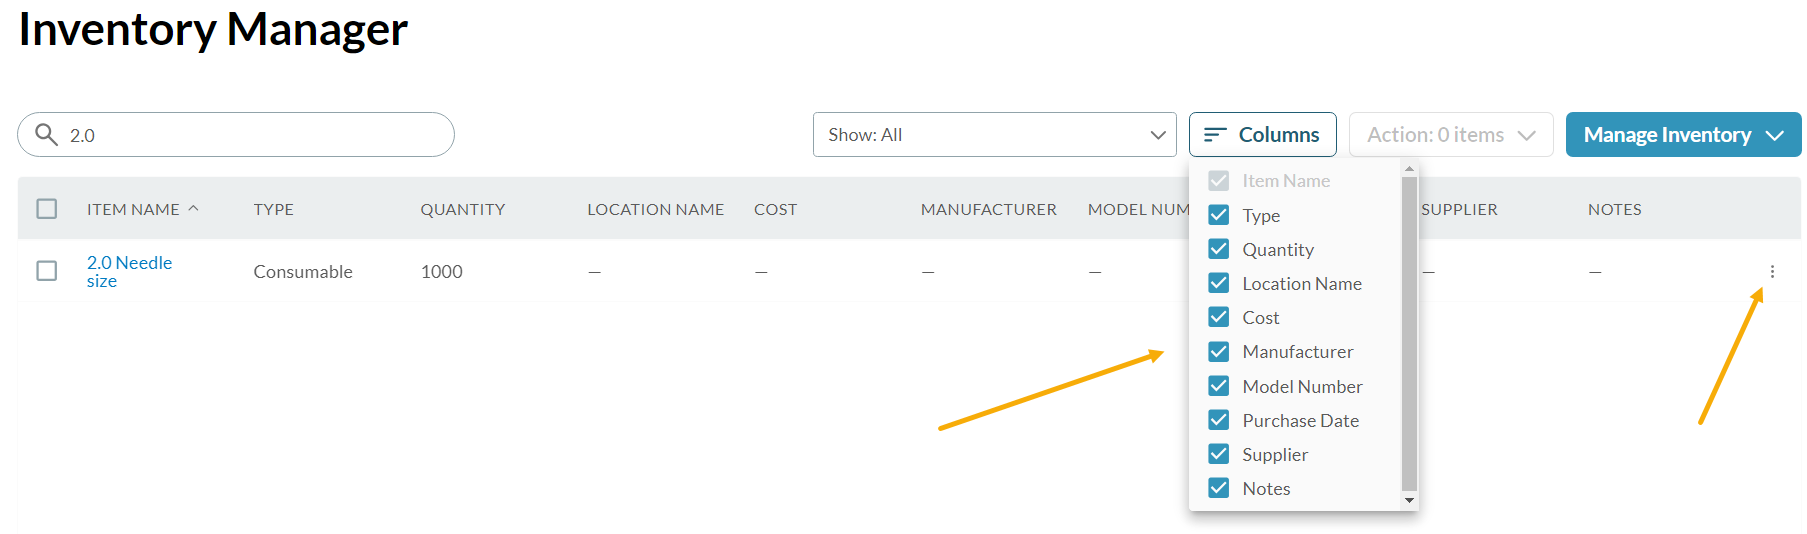
Columns
- Select which fields to display.
- Filters are saved in the URL, allowing you to:
- Bookmark specific views
- Share views with others
Tip: Use the kebab menu (⋮) next to an item to edit or archive it.

Manage Inventory

Click Manage Inventory to:
- Add inventory items
- Import inventory
- Export inventory
Add inventory item
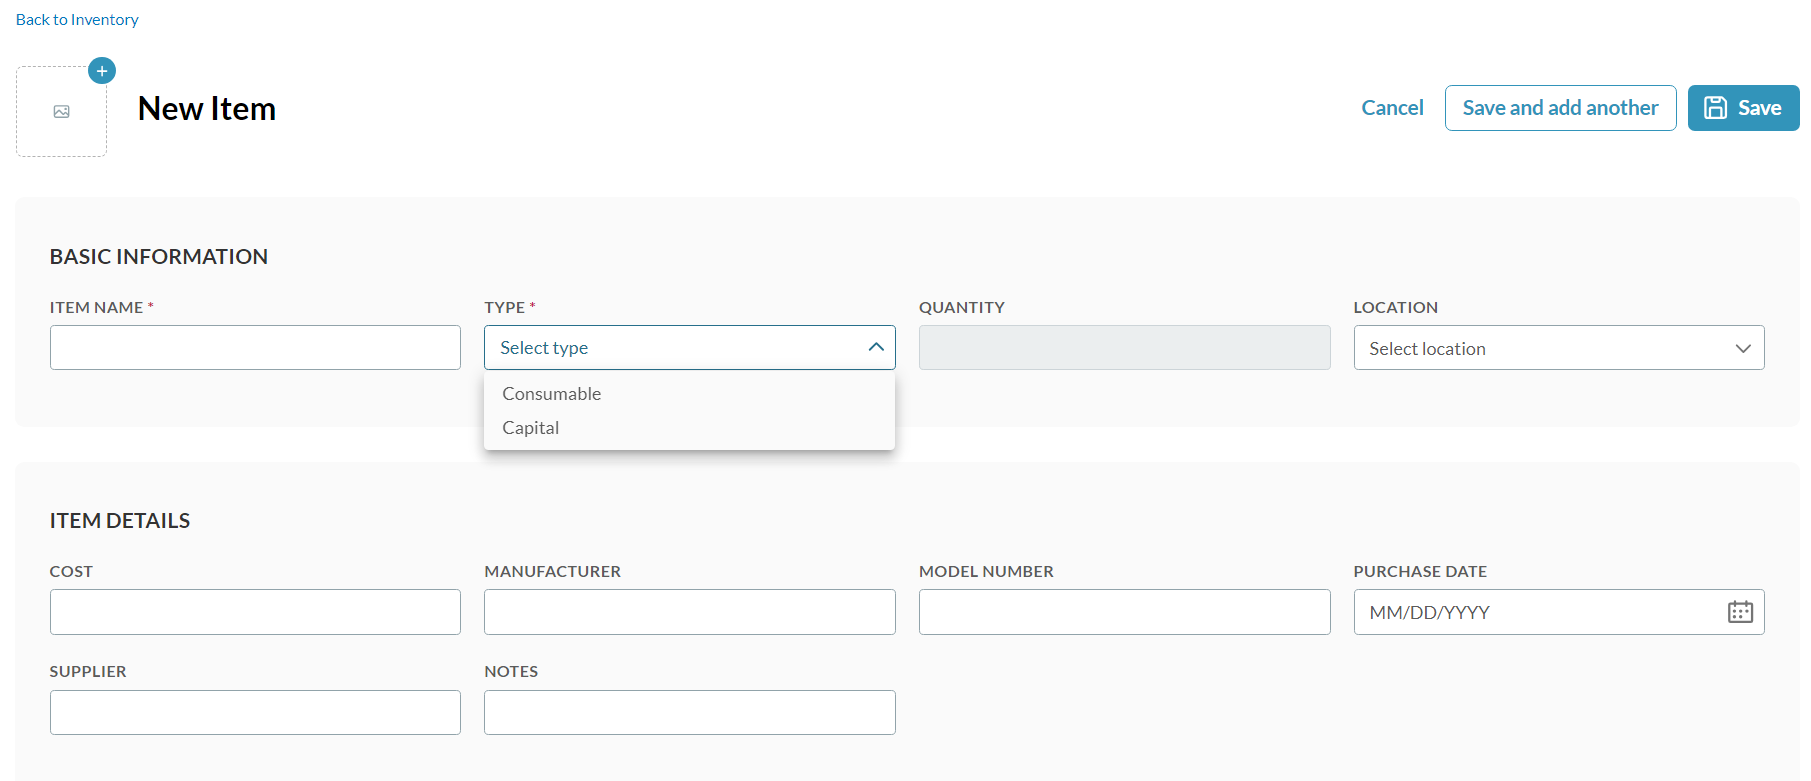
Add Inventory Item
Fill in the following fields:
Basic Information (Required)
- Item Name: One item per line
- Type: Select Consumable or Capital
- Quantity: Number of items
- Location: Pulled from System Settings (not editable here)
Optional: Upload an image of the item.
Item Details (Optional but recommended)
- Cost
- Manufacturer
- Model Number
- Purchase Date
- Supplier
- Notes
After entering details, click Save or Save and add another.
Notes
- Locations must be created in System Setup via the gear icon.
- Archived items remain in the system but are not selectable in scenarios or reservations.
Import Inventory
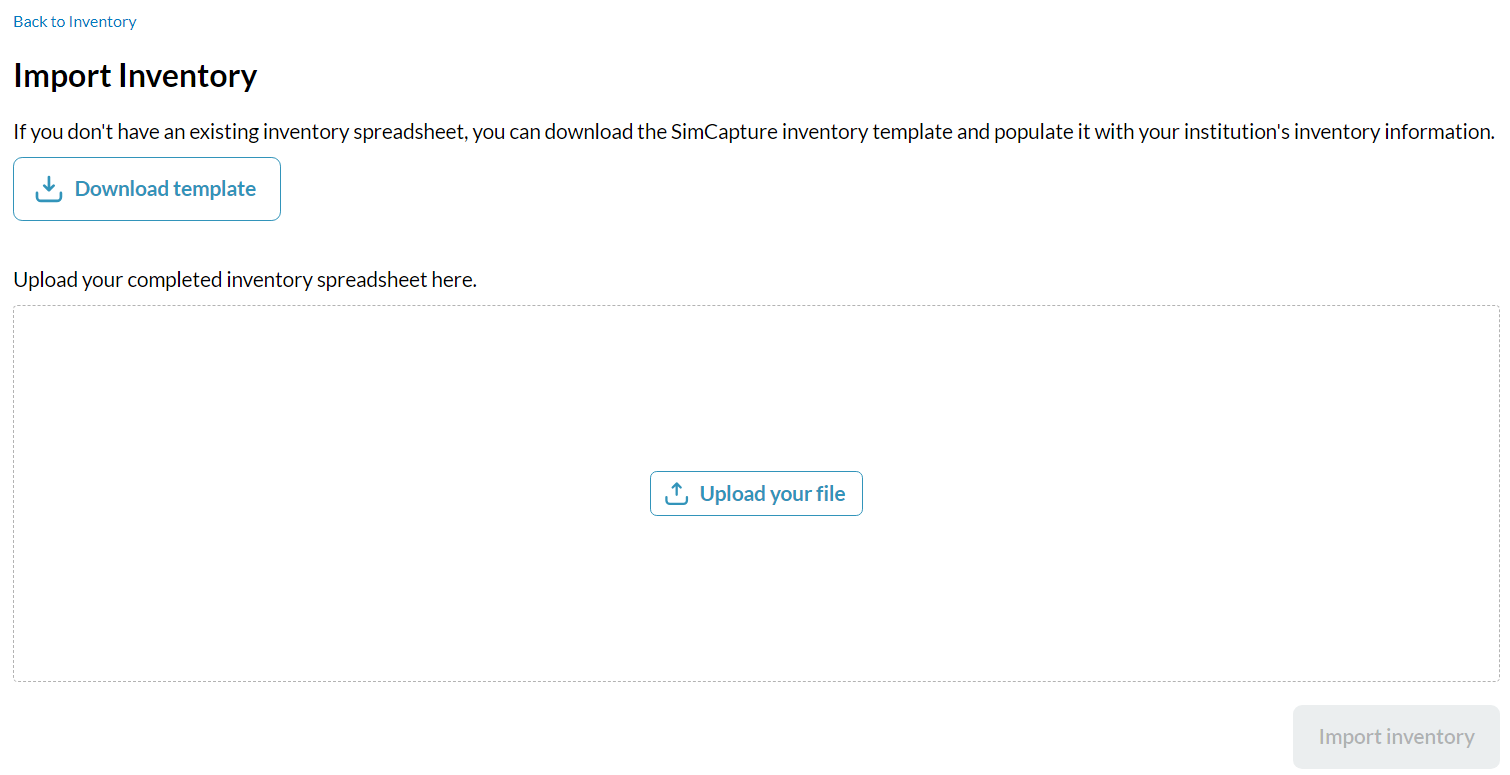
SimCapture allows you to bulk upload inventory using a pre-formatted spreadsheet.
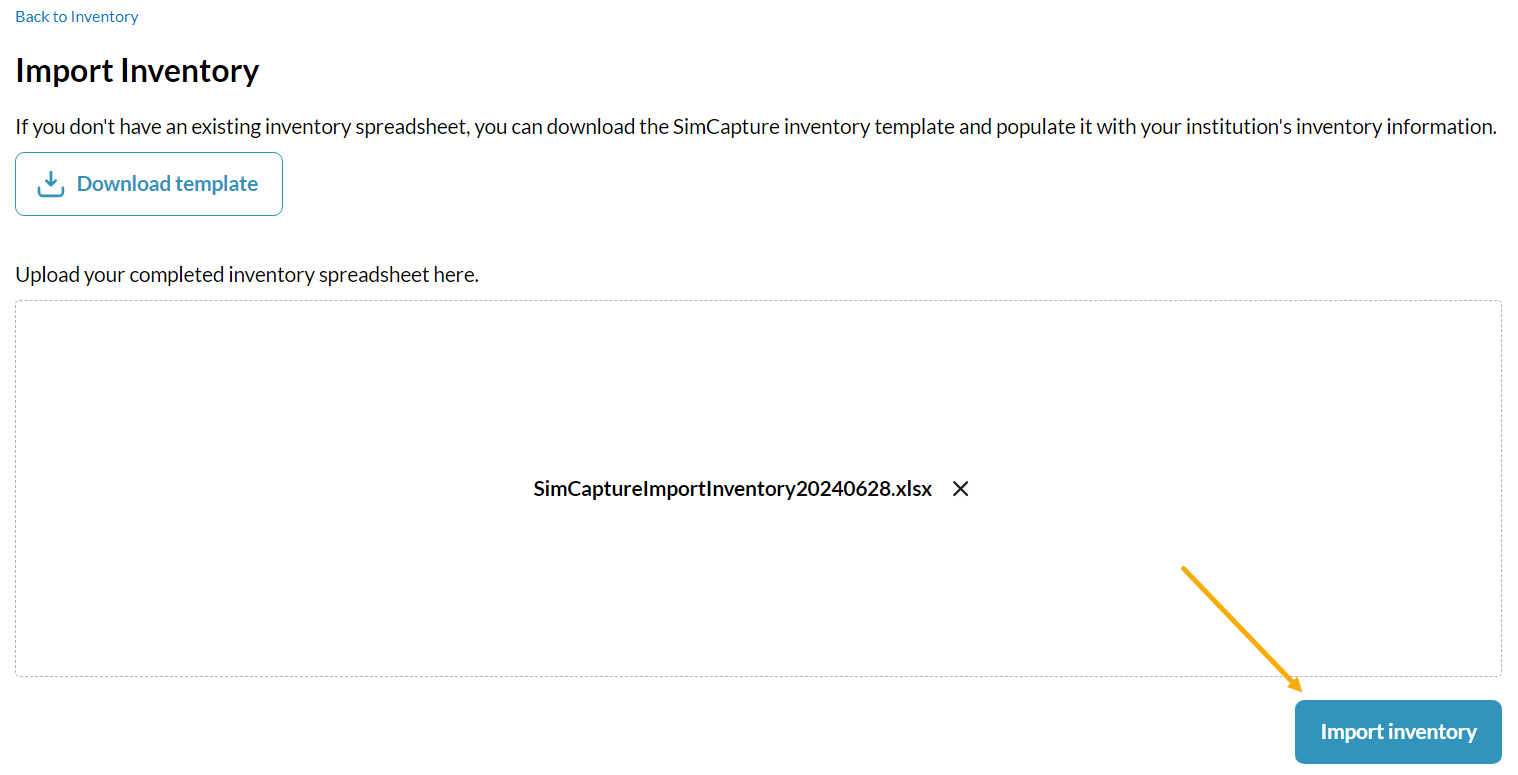
Steps to Import Inventory:
- Click Import Inventory.
- Download the SimCapture inventory template.
- Populate the spreadsheet with your institution's inventory data.
Template Fields:
| Field | Required | Notes |
|---|---|---|
| Name of Item | ✅ | One item per line |
| Type | ✅ | Capital or Consumable |
| Quantity | ✅ (for Consumables) | Leave blank for Capital items |
| Cost | ❌ | Optional |
| Manufacturer | ❌ | Optional |
| Model Number | ❌ | Optional |
| Purchase Date | ❌ | Format: YYYYMMDD |
| Supplier | ❌ | Optional |
| Notes | ❌ | Optional |
| Archived | ❌ | Defaults to Active if blank |
Important:
- Do not add extra columns to the template. Files with unmatched columns will be rejected.
- Missing quantity for consumables will trigger an error showing the line number and item name.
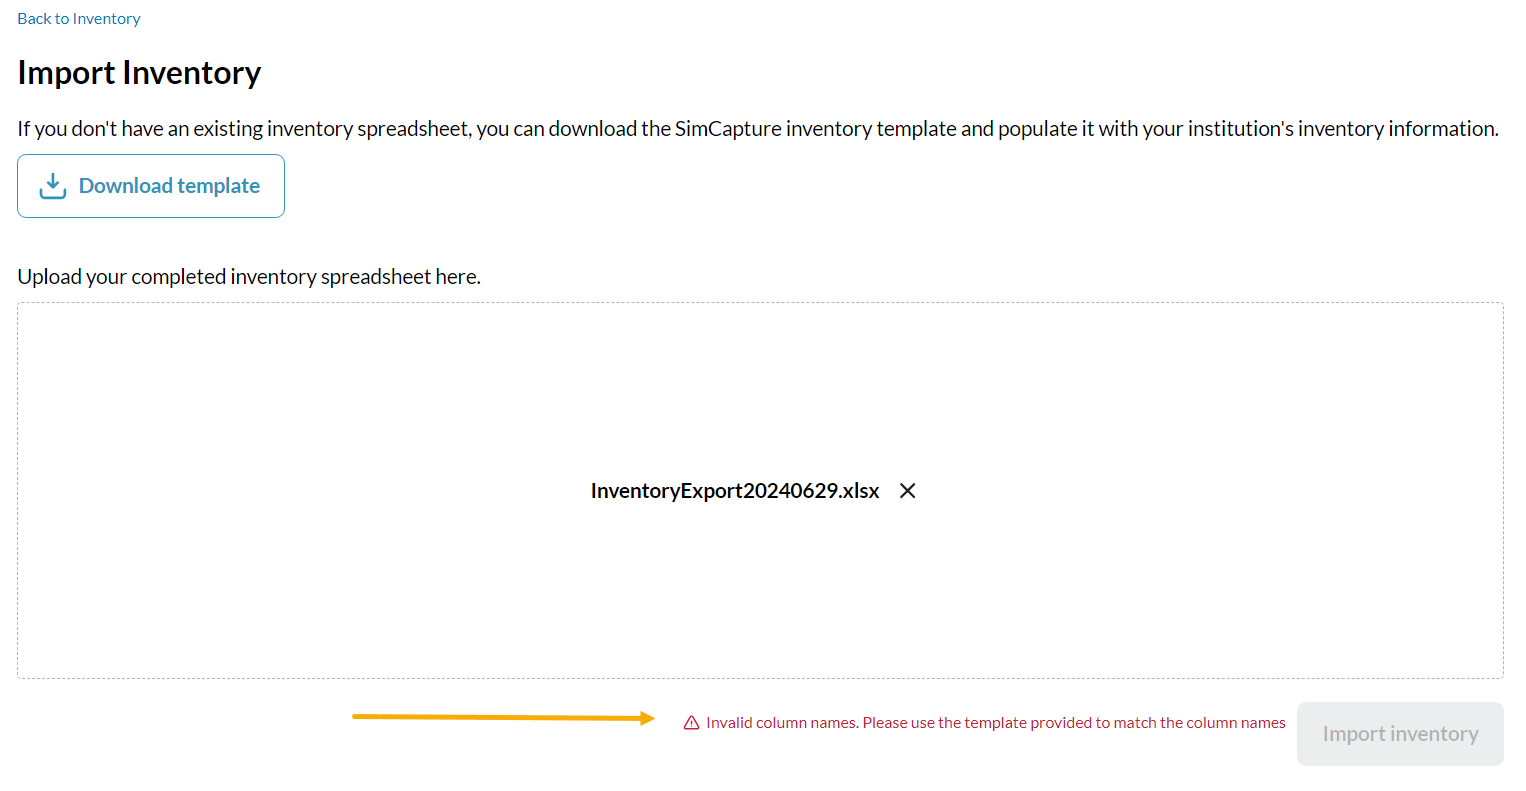
Should you not enter a quantity for a consumable item, an error will show showing the line number and item in question.
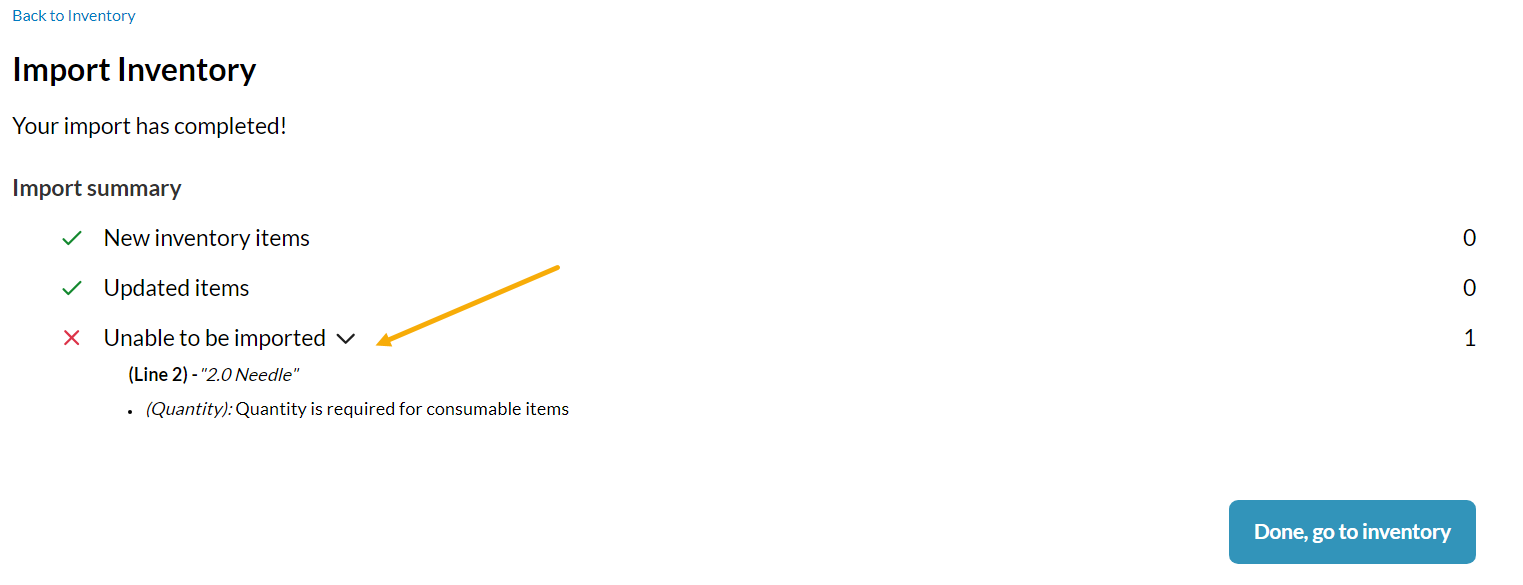
Fixing Import Errors:
If an error occurs:
- Open your spreadsheet.
- Correct the issue (e.g., missing quantity).
- Re-upload the file and click Import Inventory again.
Updating Inventory:
- SimCapture matches items by name.
- Imported data overwrites existing data.
- Example: If "Bandages" has a quantity of 50 in SimCapture and 55 in the spreadsheet, the new quantity will be 55, not added to the existing count.
Export Inventory

There are three types of inventories that you can export. Past inventory consumption, Current inventory and Estimate future inventory consumption.
Past inventory consumed
SimCapture will export your current list of inventories to a .csv file. The columns shown are:
- Course Name
- Scenario Name
- Reservation Title
- Session Title
- Session Start Date
- Session Start Time
- Session End Date
- Session End Time
- Inventory Item Name
- Inventory Item Type
- Quantity Consumed
Current inventory consumed
SimCapture will export your current list of inventories to a .csv file. The columns shown are:
- Name of item (Required)
- Type (Capital or Consumable) (Required)
- Quantity (Only applicable to consumable items)
- Cost
- Manufacturer
- Model Number
- Purchase date in YYYYMMDD format
- Supplier
- Notes
- Archived
Estimate future inventory consumed
SimCapture will estimate how much inventory you will consume after a certain amount of time by using your current scheduled reservations. A Start and End date are required for this option. The columns shown in the exported .csv file are:
- Course Name
- Scenario Name
- Reservation Title
- Reservation Start Date
- Reservation Start Time
- Reservation End Date
- Reservation End Time
- Inventory Item Name
- Inventory Item Type
- Beginning Inventory Item Quantity
- Quantity Consumed
- Ending Inventory Item Quantity
For future inventory usage, we currently look at only reservations. In this case, with the quantity consumed, if it is per session, we assume that it is one session. One reservation = one session.
If it is per participant, for an inventory item, we first look to see if the participant is self-enrolled. If the participant is self-enrolled, we look at the number of slots available. If the reservation is not set to self-enrolled, we look at the number of expected participants. If the number of expected participants is blank, we then look at the number of currently enrolled participants in the reservation.
If this area is blank, we always go with one participant.
Where does this data go?
You may wonder where all this inventory data goes. It goes to two places. The first is when you are creating a Scenario for a Course where the inventory management is attached to it.
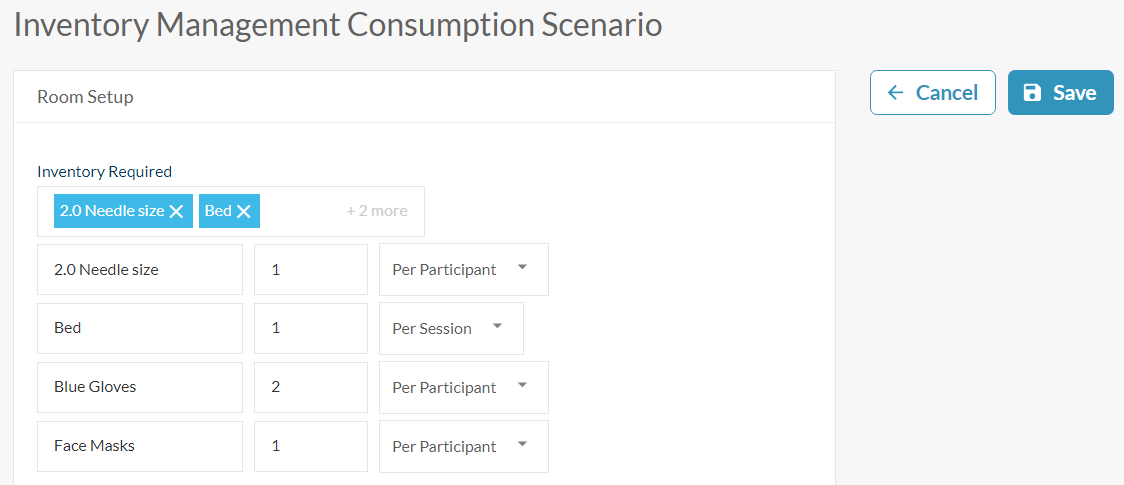
This information will be shown within Room Setup

Click the pencil icon to be taken into the Room Setup. Once inside the room, you will click inside the Inventory Required box to add new/more inventory. If an item is labeled as capital, it does not get consumed, therefore, there will be no number or Participant/Session field next to it. Note: Consumable items cannot go below 1.
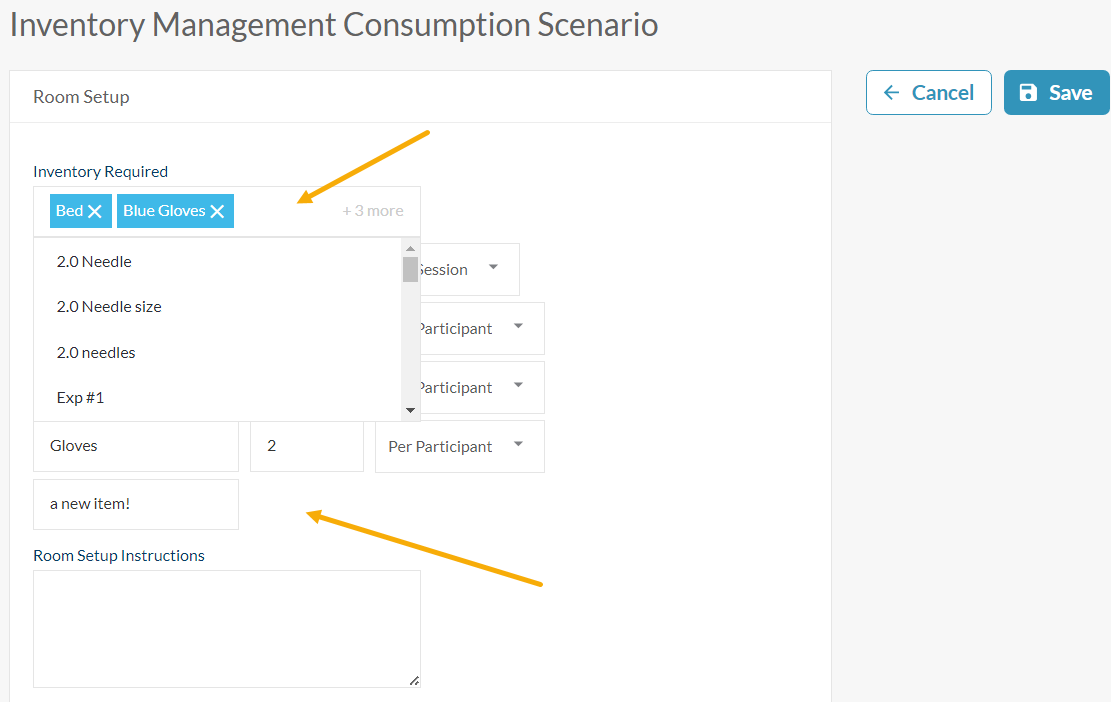
Consumable items are per session or per participant. For example, if you run a session with 3 participants, you will consume 3 "consumable" items. Running a session with 5 participants will consume 5 "consumable" items.
Per session is if you have 5 or 500 participants you are consuming the same amount. For example, you have 500 participants and 2 blood pressure cuffs, you are still using 2 blood pressure cuffs in a single session.
When you are finished with your required inventory, remember to click Save to store the inventory information within the Room Setup.
Use of inventory management with sessions
Inventory management can be used with sessions at the Ad-hoc level or at the reservation level. However, sessions at the Ad-hoc level will use inventory differently than sessions at the reservation level. Let's look at how these sessions differ when it comes to inventory management.
Ad-hoc level session
If you begin an Ad-hoc session using your inventory management scenario, the session will refer to the inventory within that scenario.
For example, your inventory management scenario has, Bed (1 per session), Face Masks (1 per participant), Gloves (2 per participant) and 2.0 Needles (1 per participant). You also have 5 Participants in this scenario.
But remember, your Inventory Manager shows the total number of items that you have on hand. In this case, you have Bed (5), Face Masks (100), Gloves (2,000) and 2.0 Needles (1,000).
You then begin your Ad-hoc Session making sure to add, within Session Settings, the correct course and inventory management scenario as well as the participants assigned to the course. SimCapture will pull the inventory information from the Scenario.

When the Session ends, you will notice that your 2.0 Needle size has gone from 1,000 to 995, Bed from 5 to 4, Gloves from 2,000 to 1,990 and Face Masks from 1,000 to 995.
These numbers are based on consumable items of 1 Bed per Session and other items being per Participant all found within the Scenario information.
Note: If an error is made, click Match inventory required to go back to the original inventory that is needed.
Post consumption
Should you realize that you did not use an inventory item in a session, you can go back to the session, edit it to remove the item you did not use and the Inventory Manager will re-add that item back into your inventory. Conversely, you are able to add items after the session and this will be deducted from the current total for that item.
Reservation level session
In this example, you will add a reservation to your calendar by accessing the calendar via the Agenda from your Course or directly.
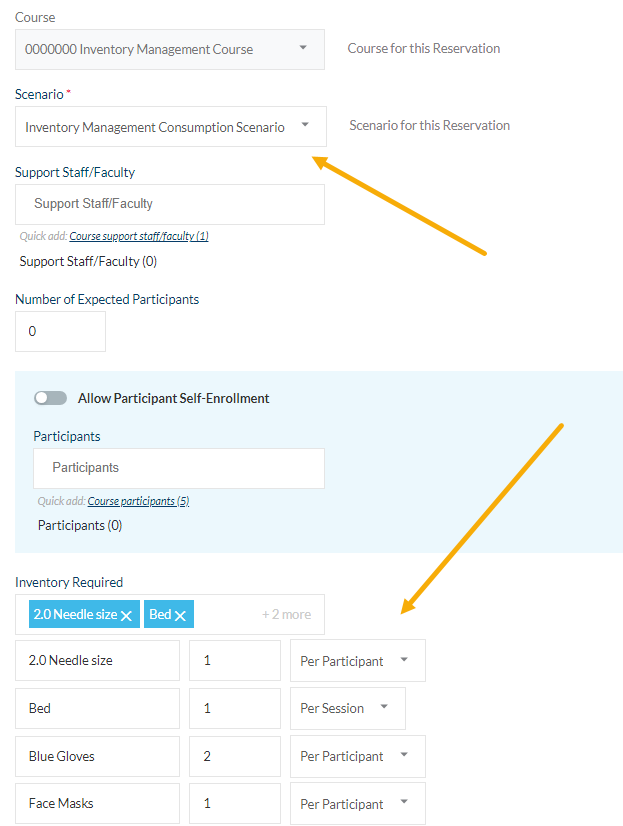
Once on the calendar click + Add Reservation. Fill in the reservation form and, if you choose a scenario that already has inventory, it will auto-populate with what is already in the scenario. You can also update your inventory here as well.
If you choose a scenario that does not have inventory, you will be able to populate any needed inventory from the reservation creation screen.

When you start a session from a calendar reservation, your inventory is pulled directly FROM the reservation and NOT from the inventory scenario you have created.