LMS Configuration for Canvas
Instructions for integrating Canvas with SimCapture to enable simulation-based learning workflows.

Written by Jeri Ellis
Updated at June 17th, 2026
Table of Contents
- SimCapture Cloud Release Notes
- SimCapture Cloud Administrator and Faculty Help
- SimCapture Cloud Learner Help
- SimCapture On-Premise Help
- SimCapture for Skills Help
- SimCapture Mobile Camera App
- SimCapture Companion Apps Help
- SimCapture Integrations Help
- Samaritan AI Help
- SimCapture Cloud Use Cases
- Hardware and Network Technical Information Help
- Glossary
Things to know before you begin
This information instructs System administrators in how to configure their LTI 1.3/LTI Advantage compliant LMS to SimCapture Enterprise and SimCapture Exam System which is the first step in using the integration. To learn more about how your data is transferred, see Data Transfer Between Your LMS and SimCapture.
Let's configure the LMS for Canvas.
Configure Canvas
Once you have logged into a Canvas instance as an Administrator, follow these steps.
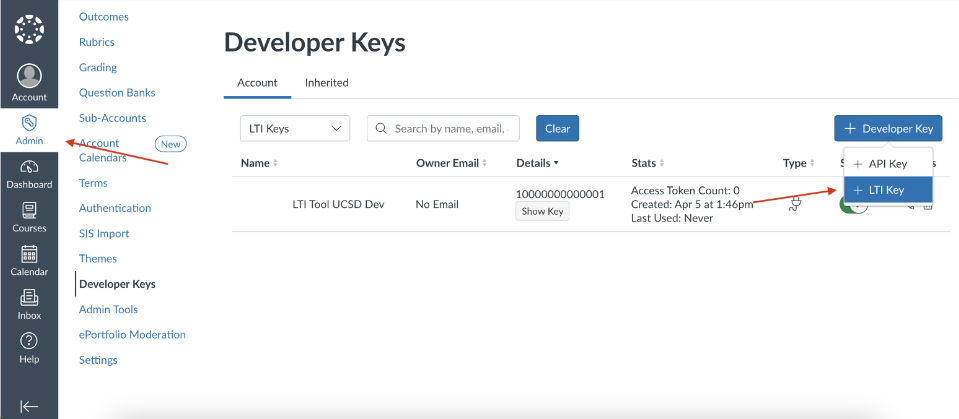
- On the left sidebar, click Admin, then click on an account which is NOT Site Admin, unless you are able and want to create courses under the Site Admin account.
- In the list of links that appear, click Developer Keys.
- Click + Developer Key, and in the dropdown that appears, select + LTI Key. This will open the Key Settings page.
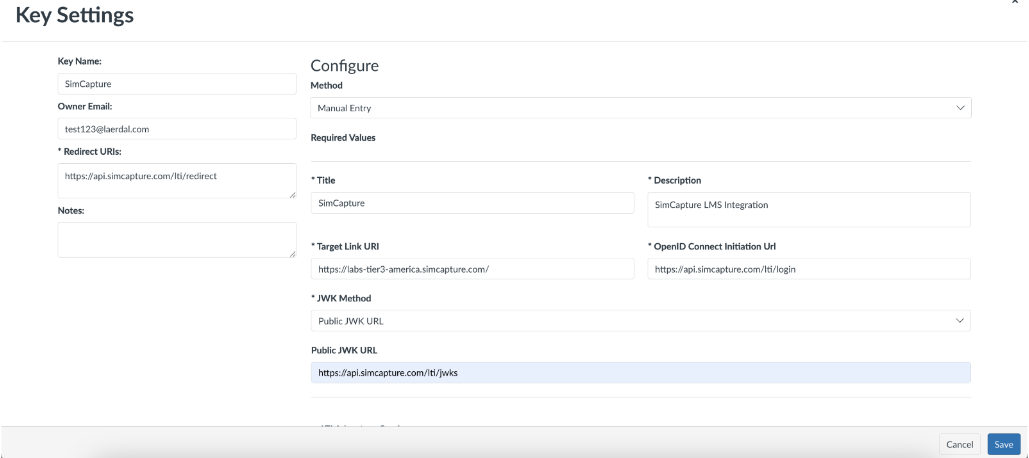
On the Key Settings page, you will see the following areas:
Key Settings
In this area, you will see:
- Key Name - Optional. But it is helpful to input the same value as the Title.
- Owner Email - Optional. Enter your email here.
- Redirect URLs* - Required. Enter https://api.simcapture.com/lti/redirect in this field. While this field allows for multiple URLs, you only need to enter a single URL here.
- Notes - Optional. This area is for any notes you'd like to add.
The API-URL needed for this step is based on your region, please select the correct URL from the list below:
- us-east-1 (US & Latin/South America) = https://api.simcapture.com
- ca-central-1 (Canada) = https://api-production.ca-central-1.simcapture.com
- eu-central-1 (EU and UK) = https://api-production.eu-central-1.simcapture.com
- ap-southeast-1 (Singapore) = https://api-production.ap-southeast-1.simcapture.com
- ap-southeast-2 (Sydney) = https://api-production.ap-southeast-2.simcapture.com
- ap-northeast-2 (Seoul) = https://api-production.ap-northeast-2.simcapture.com
Configure
In this area, you will see:
- Method - Required. Be sure to select Manual Entry in this area.
- Title - Required. Can be anything descriptive such as SimCapture LTI Tool.
- Description - Required. Can be anything descriptive such as SimCapture LTI Tool.
- Target Link URL - Required. This should be your Client's SimCapture URL and must include https:// at the start of the URL.
- OpenID Connect Initiation Url* - Required. This field must be https://api.simcapture.com/lti/login.
- JWK Method - Required. Select Public JWK URL from the dropdown.
- Public JWK URL* - Required. Enter https://api.simcapture.com/lti/jwks in this field.
*The subdomains for these URLs will vary based on your region.
LTI Advantage Services

Once you have saved the information in the Key Settings and Configure area, expand the LTI Advantage Services section and toggle all settings to ON which is indicated when the toggle switches turn green. If you do not take this action, the integration will be unable to access the necessary information to sync users and link courses.
Additional Settings

After taking the necessary action in the LTI Advantage Services area, expand the Additional Settings area and, under the Privacy Level heading, select PUBLIC so that the integration will sync users. Failure to select PUBLIC will cause the integration to fail.
Next, in the Placements area, be sure to include the following information:
- Account Navigation
- Link Selection
- Assignment Selection
Once all of this information is filled in, click Save. Other expandable information can be ignored.

You should now see your new Developer Key in the list. The State toggle will be turned off. Switch this toggle this to ON which is indicated when the toggle switch turns green.
Copy or make note of the number you see in the Details column. This number is the LTI tool ID.
Configure SimCapture
Log into your SimCapture organization take these steps these steps to configure it for use with Canvas.
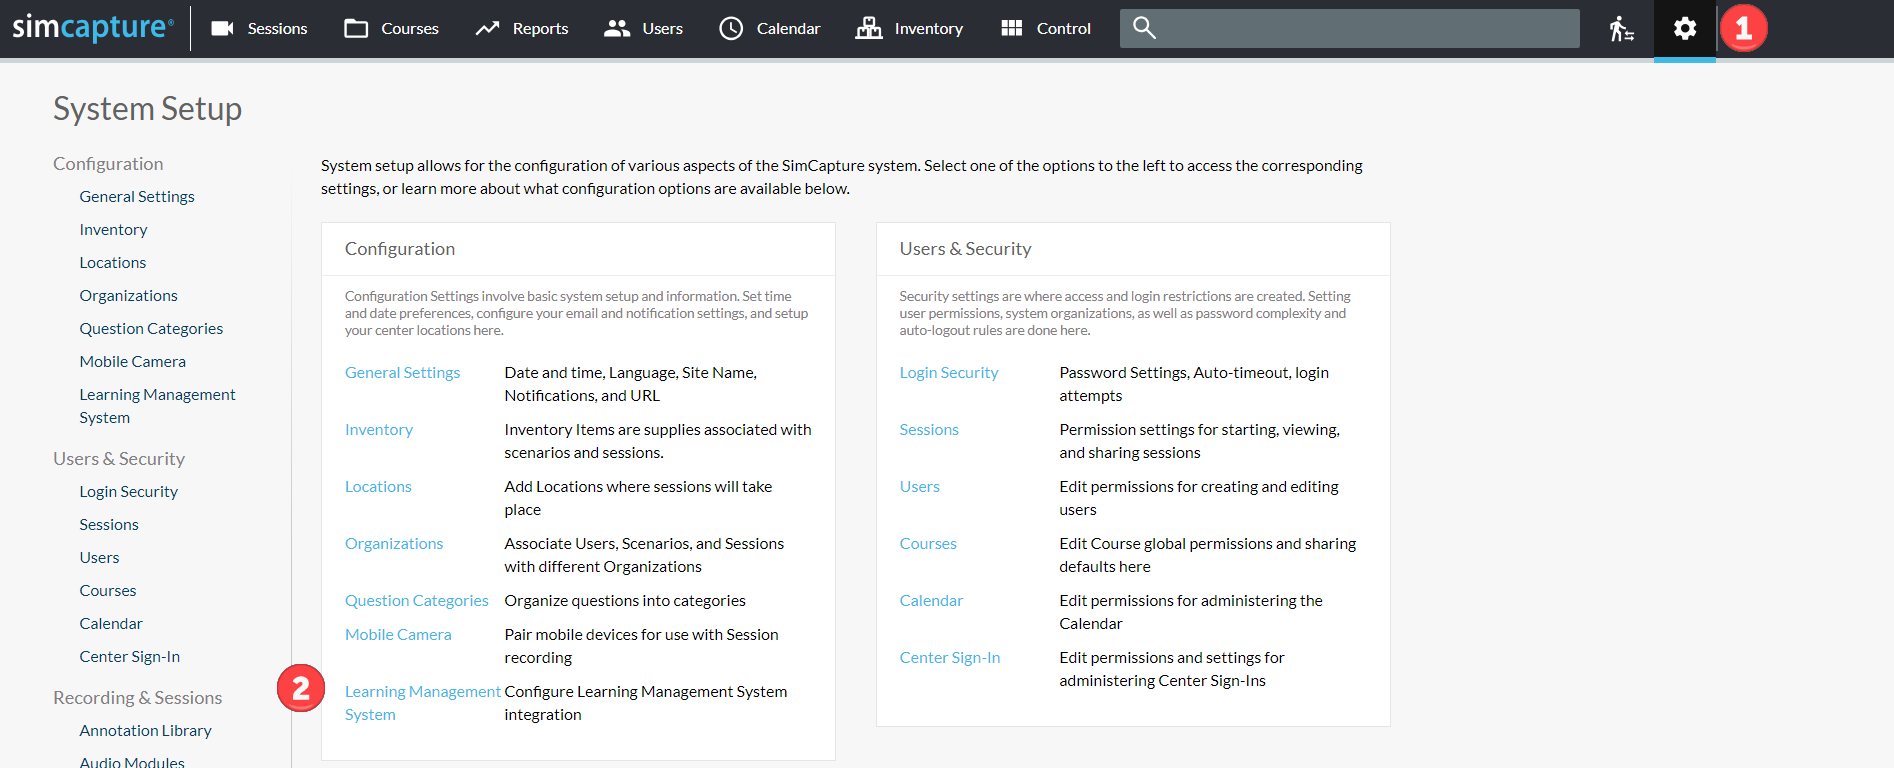
- Click the gear icon to go to System Setup.
- Click Learning Management System.
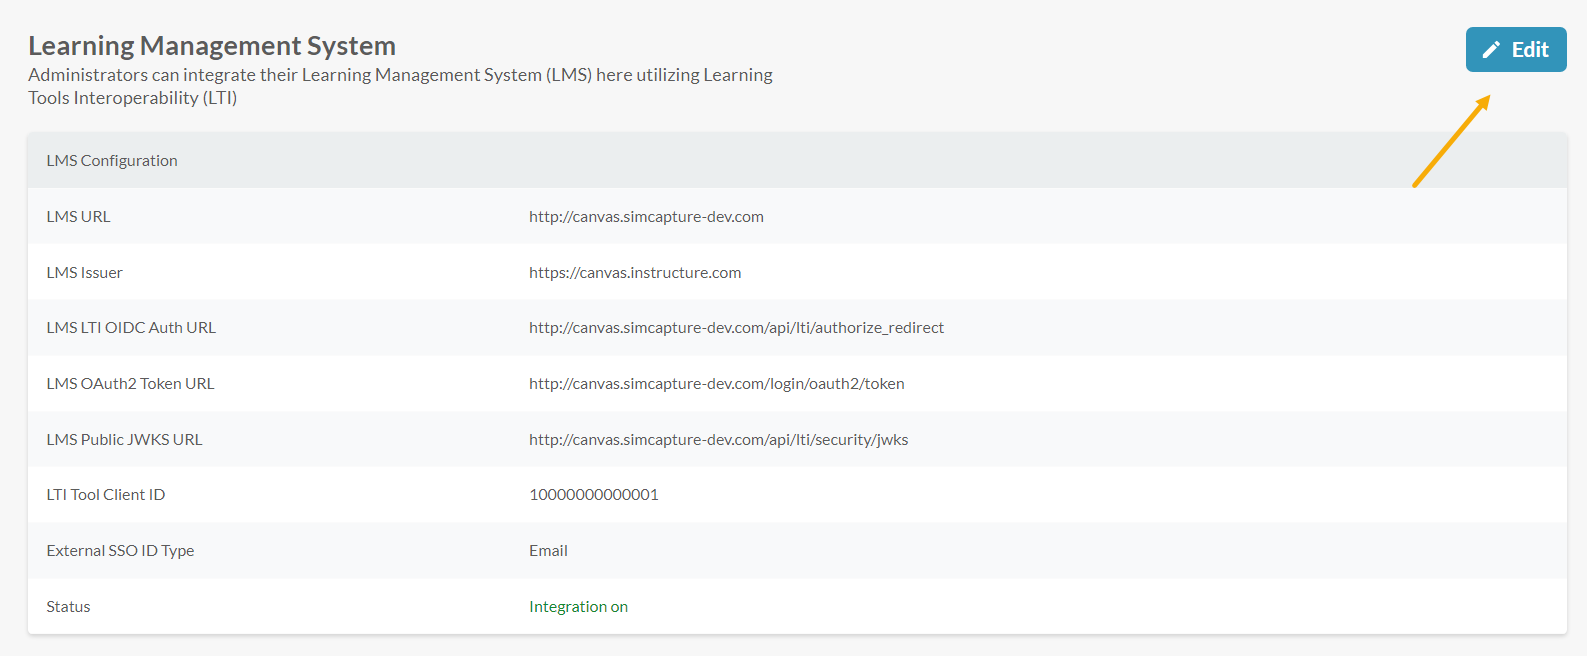
- Determine your Canvas instance’s host URL. This is the URL you normally use to access Canvas.
- Click Edit and enter the following settings:
- LMS URL: <CANVAS_HOST>
- LMS Issuer: https://canvas.instructure.com
- LMS LTI OIDC Auth URL: <CANVAS_HOST>/api/lti/authorize_redirect
- LMS OAuth2 Token URL: <CANVAS_HOST>/login/oauth2/token
- LMS Public JWKS URL: <CANVAS_HOST>/api/lti/security/jwks
- LTI Tool Client ID: Enter the LTI Tool ID you noted from the above section.
- LMS Memberships Request Limit: Leave as the default of (50)
- LMS Course Memberships Request Limit: Leave as the default of (2500)
- External SSO ID Type: Reach out to Support to set up SSO configuration.
- Check the Enable Integration checkbox
- Click Save.
Configure LTI Tool in Canvas course
Log into Canvas and take these steps to configure the LTI tool.
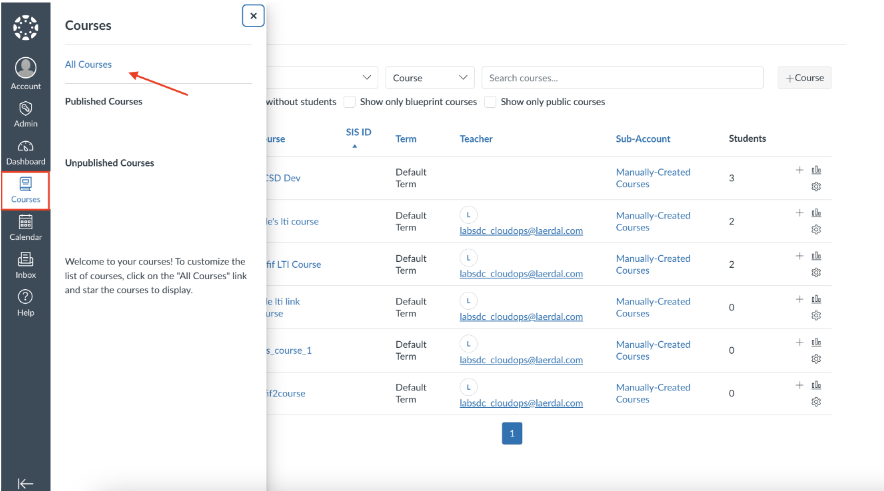
- In Canvas on the left sidebar, click Courses then click All Courses. You can find and choose an existing course or, you can create a new course by clicking + Course. Give the course a descriptive title. Leave other fields as-is.
- Click Create course.
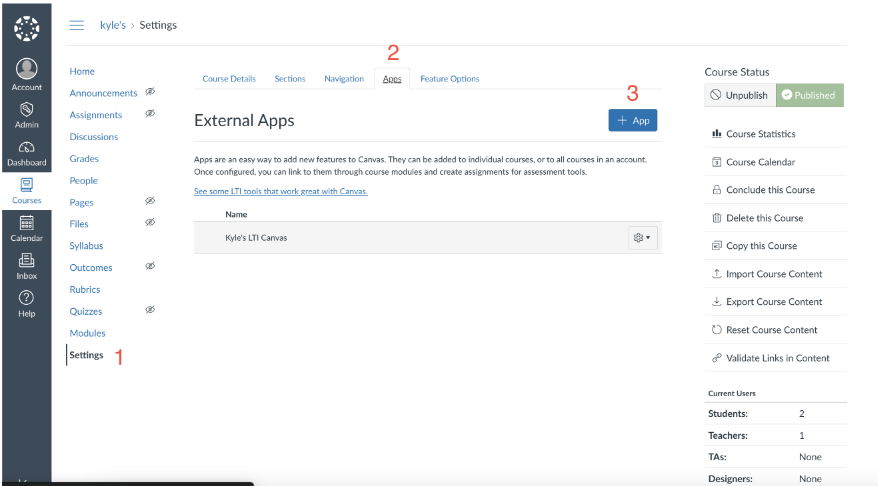
- In the Course list, click Settings (1).
- Click Apps (2). This is where you will add the LTI tool to the course.
- Click +App (3).
In the Configuration dropdown:
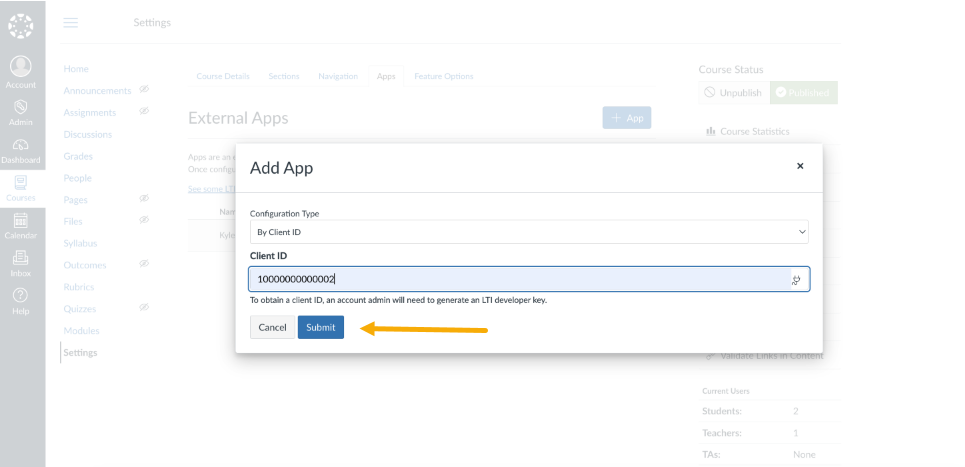
- Select By Client ID.
- Past the LTI tool ID from the previous section here.
- Click Submit. A confirmation message will appear.
- Click Install.
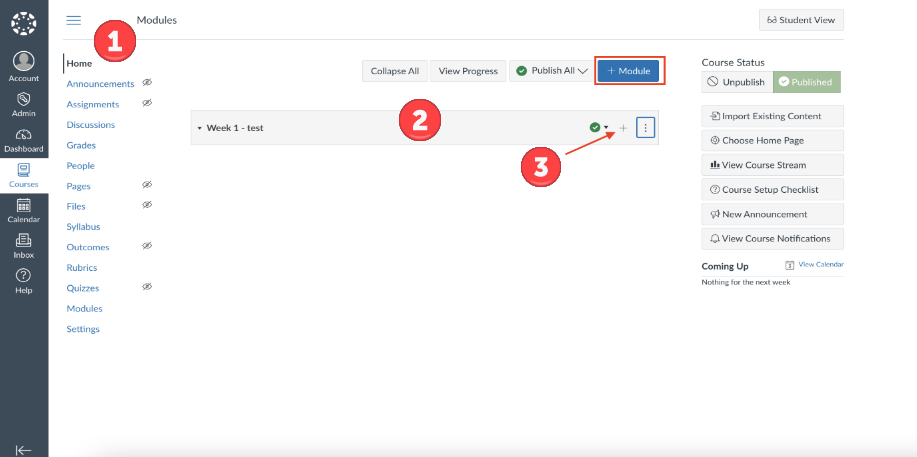
- Click Home. Find an existing module in the course or create a new module.
- Click + Module to create a new module.
- Give your module a descriptive name.
- Click Add Module.
- Click the + icon to add an item to the module.
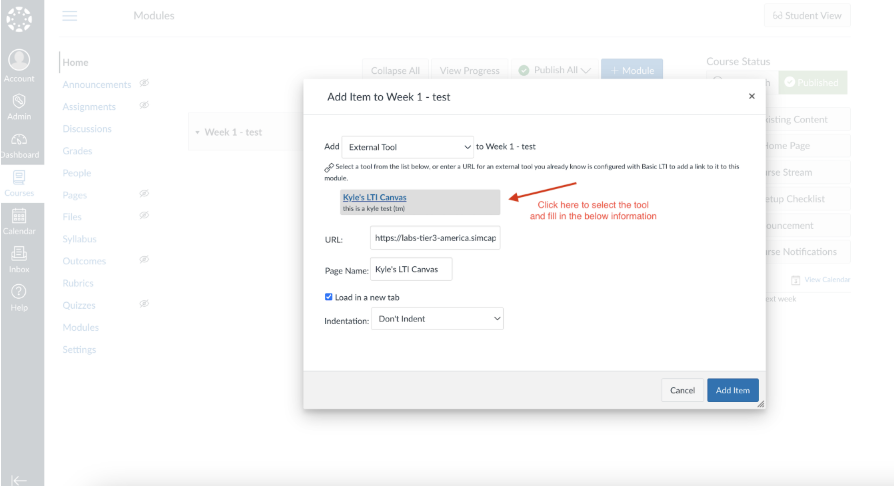
- Select External Tool from the dropdown in the modal that appears.
- Click the tool name.
- Check Load in new tab.
- Click Add Item. You should see the tool as an item in the module.
- Click this tool link.
- Canvas will navigate to a new view that shows a Load <Your Tool> in a new window button. Click this button to launch the tool.
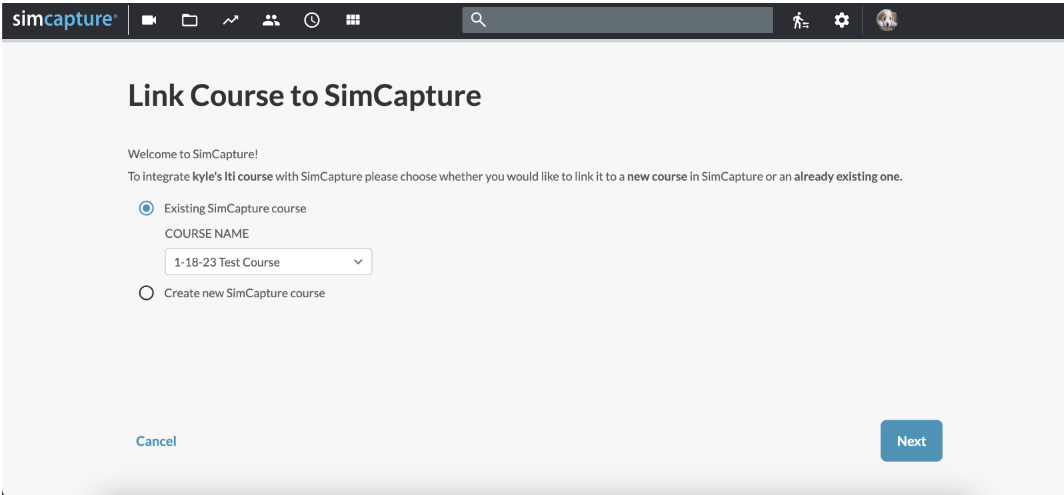
You will be redirected to SimCapture where you can choose to link the course from your LMS to an existing course in SimCapture, or create a new course in SimCapture to link to the LMS course. Once the course is successfully linked, the user information will begin to update.
Notes
- Course titles can only be transferred, lessons and other smaller components from Canvas will not appear in SimCapture
- Users are transferred on initial course linking/setup. Any future updates are applied automatically on a nightly basis.
- Courses set to the Status of ‘Completed’ or ‘Archived’ will not sync new user information